Advanced Reports: Joins
Caution
The system administrator can enable or restrict access to certain Advanced Options, including Joins. Check with them for more information. The Joins dialog is recommended for advanced users only.
Joins describe how the Data Objects on a report are related to each other. When two objects are joined, a field in the first object is associated with a field in the second object. Wherever a value in the first object’s field matches a value in the second object’s field, that value’s rows from each object come together to form a composite row. The table produced by all the composite rows is the resulting data that appears on the report.
For example, take the following objects, Orders and Products. The Orders.ProductId field corresponds with the Products.Id field. When the objects are joined from Orders.ProductId to Products.Id, the rows are connected wherever those two fields have matching values.
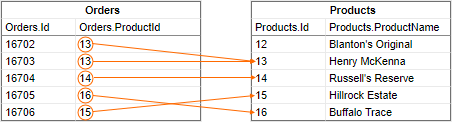
Categories joined on Orders.ProductId >> Products.Id
The result of this join is the following composite rows. These objects have a one-to-one relationship, because each row in the “left” object joins at most one row in the “right” object.
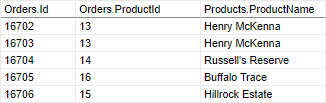
Joined Data Objects. Products.Id is omitted.
Tip
Data Objects could be joined along more than one set of fields; composite rows are formed only when all sets have matching values.
For two data objects to be co-present on a report, there must be a join path between them. They are either directly joined, or there is a path through one or more intermediate data objects. You do not have to configure joins manually as they already exist in the environment. However, if you want to learn how to add or adjust joins on a per-report basis, the following sections explain the options that are available.
Join Types
The join that was previously described is the most common type of join, an inner join. When an inner join is applied, rows in either data object that have no matching row in the other are excluded from the resulting table. However, you may not want to exclude these rows. To do so, you can change the type of join to an outer join.
For example, the row in the Products object with Products.Id = 12 has no matching row in the Orders object. With an inner join, this row is excluded from the output. If you want to see the Products rows that have no matching Orders row, you can change the join type.
This changes the join between these data objects to a left outer join, because all rows from the left object are included. The following rows result:
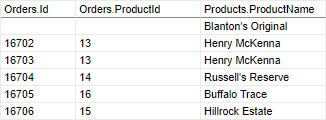
Joined data objects with all Products rows. Products.Id is omitted.
Similarly, selecting the Orders data that does not have Products data checkbox changes the join to a right outer join, which includes all rows from the right data object. Selecting both checkboxes includes all rows from both categories; this is a full outer join.
Relationship Types
There are two types of join relationships: one-to-one and one-to-many.
In the previous example, the relationship between the data objects is one-to-one, because each row in the left object joins at most one row in the right object. Some categories have a one-to-many relationship, where each row in the left object joins zero or more rows in the right object.
A one-to-many relationship from objects X to Y is represented in the following diagram:
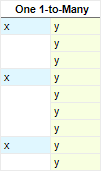
Each X is joined to one or more Y
Reports with a single one-to-many join are well suited to grouping by the left data object. The data in these reports is generally well-formed and understandable.
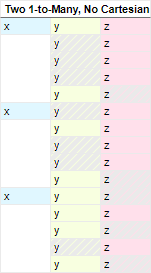
However, when a report has multiple data objects with one-to-many joins, data can appear more disorganized and confusing. For example, the following diagram represents data from three objects: X, Y, and Z, where the relationships between X to Y and X to Z are both one-to-many:

Each X has 1 or more Y, and 1 or more Z
Because Y and Z are not directly related to each other, there are many rows with only Y or only Z. This can cause the report to be significantly larger, and to be difficult to read and interpret. This occurs even with inner joins, the most restrictive type, because by default there is no logic that deals with the relationship between Y and Z.
Read on for different ways of improving the structure of a report with multiple one-to-many joins.
Cartesian Processing
You could fill the blank spaces with supplementary data by disabling Special Cartesian Processing from the Joins dialog. Blank cells are filled in with data that is repeated directly from the previous row. The following diagram demonstrates how this works:
Disabling Special Cartesian Processing
The shaded cells represent data that has been repeated from the previous row. This can make the report more readable. However, this approach poses a problem: Blank cells indicate a lack of a relationship between two fields, so filling in these spaces with artificial data can obfuscate any relationship between Y and Z. This can decrease the accuracy of the report.
There are better ways to improve the readability of such a report without sacrificing accuracy:
- Use repeating groups to show the X to Y and X to Z relationships in entirely separate sections. This is suitable if any relationship between Y and Z is irrelevant or nonexistent. See Sections for more information.
- Hide some or all of the rows which do not have data for both Y and Z. This is suitable if you want to highlight an implicit or indirect relationship between Y and Z.
Modifying Joins on a Report
The Joins dialog shows all direct and implicit joins on the report. Direct joins can be added, modified, or removed from the report.
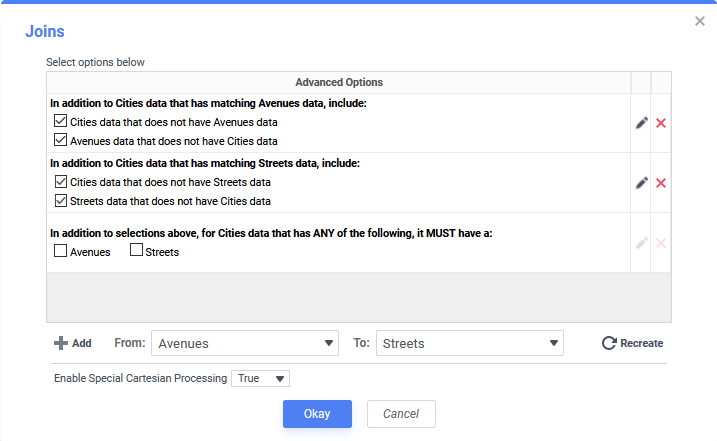
Joins dialog for a report with two one-to-many joins, so the Special Cartesian Processing dropdown is visible.
Create a New Join
- Select From and To categories.
- Click
 Add.
Add.
- Click Add Condition then select From (left column) and To (right column) fields.
Tip
If there are multiple conditions, only the rows that satisfy all the conditions are joined.
- Click Okay
- Click
- Click Okay
 Add.
Add.
To restore the default joins, click the  Recreate button, then click Okay.
Modify a Join
- Click the Edit icon next to the join to edit.
- Add, remove, or modify conditions.
- Click Okay.
 icon next to the join to edit.
To remove a join, click the Delete  icon next to the join to delete, then click Okay.
Delete a Join
To remove conditions, click the Delete icon next to the condition to delete.
Advanced Joins
You may be able to specify join conditions that are more complex than column equality.
Note
Advanced Joins only apply to a single data source.
Type
Instead of joining between two columns, one or both sides of the join may instead be an arbitrary expression, constant, or SQL sub-query.
To change the expression type for one side of a join condition, select one of the following from the Type list:
- Value: One or more constant values separated by commas
- Expression: Formula or calculation
- SubQuery: SQL query
Then enter the value in the Value field.
Operator
As opposed to the default equality (=) operator, which joins fields from the left expression to matching fields from the right expression, a join condition can use one of several alternative operators instead. For example, the inequality (!=) operator joins fields on the left to non-matching fields on the right. To do so, select one of the alternative operators ;from the Operator list:
!=not equal to>greater than>= greater than or equal to<less than<=less than or equal to equalIN: match one or more values, either specified or calculated from a subquery
Grouping
When a join has two or more conditions, you can specify how the conditions should be met as a group in order for the join to take effect.
To specify that either one of two conditions will satisfy part of the clause, select OR from the Conjunction list for the first condition of the two.
To add parentheses around two conditions, select the Group checkbox for the first condition of the two.
You can preview the full join clause in the Summary field.
