Advanced Reports: Templates
Note
Document Templates are an optional feature. Check with the system administrator for more information.
An Advanced Report can be used to dynamically fill out fields in forms and other documents. Placeholders in the document are dynamically linked to fields in the report. When executed, the form or document is merged with the report data.
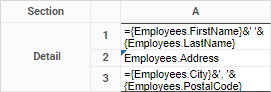
Report layout in the Advanced Report Designer
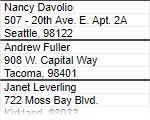
Report data

W9 template form with data merged from report
This article covers the three stages of working with document templates:
1. Creating Template Documents
The process for making templates differs between the three supported document types: PDF, Word (.doc, .docx and .rtf), and Excel; as do the available features.
Caution
Close the template file before running or saving a report that uses it.
PDF Templates
PDF templates support static fields and limited-repeating fields. PDFs are convenient for pre-existing and standardized forms, such as for government or business.
To create a PDF template:
- Open the form in a PDF editor program, such as Adobe Acrobat or PDFescape.
- Add form fields where you will insert report data. For fields where text may span multiple lines, select the multi-line property.
- Give each form field a unique name following these guidelines:
- For static fields, which appear only once per template instance — use any name, with the exception of the format reserved for repeating fields.
- For repeating fields, which are mapped to consecutive values in a repeating cell or in a detail section — use the following naming format:
Name.0, Name.1,...
WhereNameis shared by the repeating fields, and0maps to the first value,1maps to the next value, and so on. - For checkboxes — use an If() function whose results are “X” for a checked box and ” ” (space) for an unchecked box. For example,
=if({Employees.Title} = 'Sales Representative', 'X', ' ').
- Save the PDF. Then continue with the instructions in 2. Linking Document Templates to a Report.
Word Templates
Word templates support static fields, limited and unlimited-repeating fields, and conditional suppression.
Tip
Supported file types are
.doc,.docx, and.rtf. Report templates exported as “RTF” will save to the original file type.
To create a Word template:
- Open a document in Microsoft Word or a compatible document editor.
- Add text where you want to insert report data.
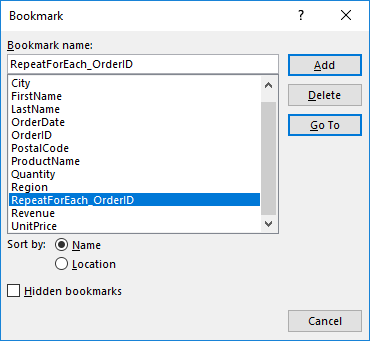
- Select the text, or in the case of repeating fields, a region of text, and insert a bookmark.

- Give each bookmark a unique name, as follows:
- For static fields, which appear only once per template instance — use any name, with the exception of the formats reserved for repeating and conditional fields.
- For limited-repeating fields, which are mapped to consecutive values in a repeating cell — use the following naming format:
FieldName_0, FieldName_1, ...WhereNameis shared by the repeating fields, and0maps to the first value,1maps to the next value, and so on. - For unlimited-repeating fields, which are mapped to all the values in a repeating cell — use the following naming format:
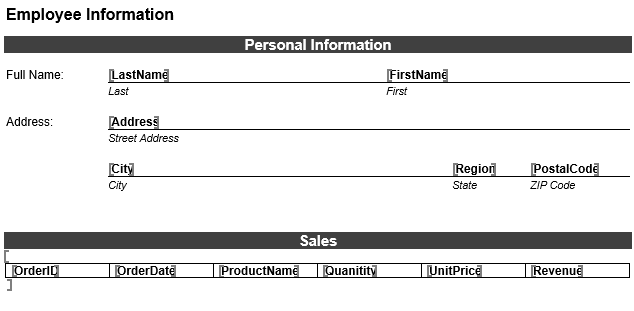
RepeatForEach_FieldNameWhereFieldNameis a unique name. A RepeatForEach section in templating follows similar structure and purpose to grouping within reports. It is used to organize information under repeating groups within templates, arranging related information on the same page and separating groups with page breaks.
Important
Bookmark formatting for unlimited-repeating fields must follow specific spacing requirements. The opening bookmark bracket should be placed one line before the repeating field section begins, and the closing bookmark bracket should be placed one line after the repeating field sections ends. Refer to the Employee Information example above for a visual reference. If this formatting is not followed, an “itemStart and itemEnd must be contained in one text body” error may be thrown.
- Optional: To conditionally show or hide text:
- Select the text and add a bookmark with the following naming format:
KeepIF_FieldNameWhereFieldNameis a unique name. - In the report, map this field to a cell with a formula that returns 1 if the text should be shown, and 0 if the text should be hidden. For example,
=If({Products.ProductName} = "Chai", 1, 0) - Save and close the file. Then continue with the instructions in 2. Linking Document Templates to a Report.
Microsoft Excel Templates
Excel templates work differently than other types. Templates are used to fill Excel columns with report data. This is useful for passing data to Excel charts, pivot tables, and macros.
To create an Excel template:
- Open a workbook in Microsoft Excel or a compatible spreadsheet editor.
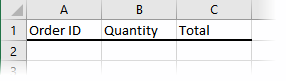
- The first worksheet is used for dynamic report data. Repeating cells are mapped to columns in the worksheet. For each column where you will add report data, enter a unique name to the topmost cell in the column. All following cells must be empty. All other worksheets will remain unchanged by the report.
Formatting an Excel file to be used as a template
- Save the file. Then continue with the instructions in 2. Linking Document Templates to a Report.
2. Linking Document Templates to a Report
To use a report to fill out a template:
Editing of fields in exported PDF templates, v2018.2+
- Enter field data in cells on the report. For repeating data:
- Repeating cells mapped to static template fields make a new instance of the template for each repeat.
- Repeating cells mapped to limited-repeating template fields make a new instance of the template each time the number of values exceeds the limit.
Note: This is often undesirable. Ensure that there are appropriate constraints on your data and enough fields to fit it all. - Repeating cells mapped to unlimited-repeating template fields never make a new instance of the template. Overflowing data is cut off.
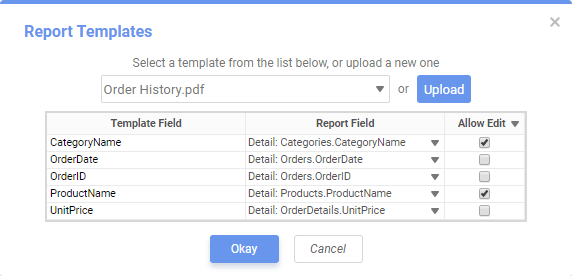
- pre-v2021.1: On the Settings menu, click Template to open the Report Templates dialog. Select an existing template or click the Upload button to upload a new one.
- v202.1+: On the Advanced menu, click Templates to open the Report Templates dialog.
- For each template field:
- Select a report cell containing text or data. Images, visualizations, and other widgets are not supported.
- Leave it blank. Any bookmarked text shows as-is in the output.
- Select whether or not to allow editing of that field in the exported PDF file using the Allow Edit checkbox. v2018.2+
- Click OK.
 Settings menu, click
  Template to open the Report Templates dialog. Select an existing template or click the Upload button to upload a new one.
To remove a template from a report:
- From the Template dialog, select the blank option from the template list.
- Click OK.
3. Executing Template Reports
To generate the filled out forms or documents, simply Export the report in the same format as the template file (e.g. for a PDF template file, export the report as a PDF. For a Word template, export as RTF). Reports can be exported from the toolbar or from the main menu.
Tip
Template reports must be exported in the same file type as the template (i.e. a PDF template report must be exported as a PDF file). Review the General Section of the Report Options article for details on how to control report export types.
Referencing Data Exported to Excel Templates
When using an Excel Template there are two ways for Charts or Pivot Tables to reference the populated report data:
Named Ranges
Excel has a concept of a Named Range which can be used by Charts or Pivot Tables to refer to a range of cells. When building the template, name ranges by:
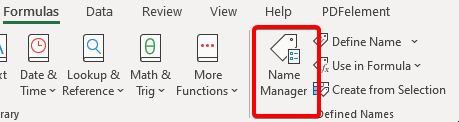
- On Excel’s ribbon, navigate to the Formulas tab and click the Name Manager icon.
- Click New to add a new named range.
- The Name must match the name of the first worksheet in the file.
- The Scope should be Workbook if the chart or PivotTable will reside on a different worksheet than the first one.
- Optional: add a comment
- In the Refers to field, select the upper left and upper right boundaries of the range. For example, to select all of the data from columns A–J, select those cells or enter
DATA!$A$1:$J$1.
Note
When the report is exported, the range will automatically be expanded to include all of the rows.
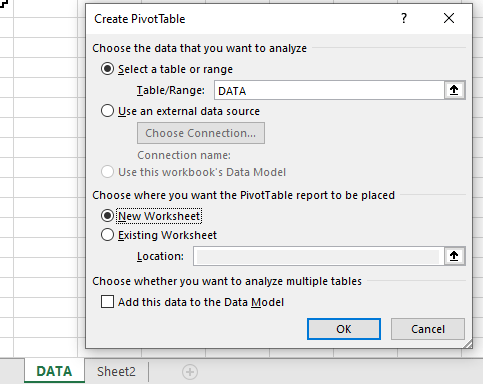
- When building the Excel chart or PivotTable, use the Named Range created in steps 1–2 as its data source.
Row References
Instead of using Named Ranges, each Chart or PivotTable can be set to reference the first two rows on the first worksheet. For example, a template with 5 columns would reference =Sheet1!$A$1:$E$2. When the report is exported, the range will automatically be expanded to include all of the rows.
