To clone an object, right-click and select Clone from the context menu
To edit an object either:
double click it
select it and click the Edit icon at the top of the main menu
right-click it and select Edit from the context menu
To delete an object either:
select it and click the Delete icon at the top of the main menu
right-click it and select Delete from the context menu
To save changes and new objects click the Apply or Okay buttons.
Data Object Properties
A data object has the following properties:
Name
Select the data source from the first dropdown. In the second drop-down select a data object. This field is required.
Note
This will display all the of the source’s tables, views, methods, stored procedures, and functions.
To add custom SQL click the Add Custom SQL icon next to the Data Sources dropdown. For more details see Custom SQL Objects.
Important
The name of data objects may not contain the following characters:
{ } [ ] , . %
To create a data object for a database table (or other backing model) with one of these characters in its name, create a Custom SQL Object with a simple SELECT clause. For example for a table named sales.figures.2020:
SELECT * FROM [sales.figures.2020]
Note that the identifier delimiters (the [ ]) around the table name will vary with the database type.
Alias
The user friendly name for the data object. The alias will be displayed to end-users. This field is required.
Important
An alias may not contain the following characters:
@ { } [ ] , . %
Unique Key Fields
The columns which uniquely identify a record in this data object. This field is required.
Folder v2020.1+
Category pre-2020.1
The folder used to group related data objects. A hierarchy can be created by using backslashes between names.
Northwind
Data objects in a single folder
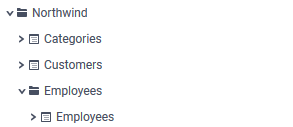
Northwind\Employees
A hierarchy of data objects
When configuring Multiple Data Models, separate the different folder names with a comma.
ID
An application-wide unique identifier for the data object. IDs are required when creating multiple data objects with that have the same name but come from distinct data sources. IDs can also be used to optimize Web Service and .NET Assembly calls. For more information see Data Object IDs at the end of this article.
Note
By default all objects have an implicit object ID that is set behind-the-scenes. This field allows you to set the IDs explicitly. It is generally recommended to set explicit IDs for all data objects. As of v2019.1.12, this field will display the implicit ID by default.
Parameters
Parameters that are passed to stored procedures, table functions, Web Services or .NET Assembly methods. Clicking in the drop-down will bring up a menu. Click the Add button and select the parameter from the drop-down list. For more information see Stored Procedures and Web Services & .NET Assemblies.
Parameter values are passed in the order in which they are listed in the data object. It is critical to ensure that the order is correct.
Tenant Columns
Specify which columns contain tenant information and link the parameters accordingly.
This setting is used to filter data when multiple users’ information is held within the same table or view, and a column holds information identifying each user. Exago will only retrieve the rows where the column value matches the corresponding parameter.
Description
Provide an optional user-friendly description of this data object. When this object is hovered over in the Data Fields Pane, the description text will pop up in a tooltip.
Both plain-text can be added verbatim or a language file ID can be supplied. See Column Description v2016.3+ below for more information.
Column Metadata
Specify any columns that should not be filterable, visible, or that should be read as a specific data type. See Column Metadata for more information.
Schema Access Type
Specify how Exago should retrieve the schema for the data object. There are three possibilities:
Default — Follow the global Schema Access Type setting in Other Settings.
Datasource — Queries the data source for the schema.
Metadata — Reads the schema from the stored metadata.
As of v2019.1+, the Schema Access Type defaults to Metadata. The optimizations made to the configuration architecture in this version alleviate the performance issues previously associated with loading large configuration files—metadata playing a primary role in increasing configuration file size. Exago now strongly encourages the full use of metadata in combination with the new configuration optimizations as this will reduce the frequency in which the application queries databases.
Note
For more information regarding the performance enhancements of v2019.1+, please see this article.
Filter Dropdown Object
Specify an alternative data object or custom SQL to be queried when a user clicks a filter value dropdown (for example in the Report Designer’s Filters dialog, the Filters pane of the Dashboard or ExpressView Designer)
Filter value dropdown in the Report Designer’s Filters dialog
Important
The Filter Dropdown Object must have a column with the same name as each column in the main data objects or an error message will be displayed to the user when clicking the dropdown.
To set a Filter Dropdown Object, choose a Data Source and then:
select a table or view from the dropdown on the right, or
click the Custom SQL icon to write custom SQL statements to retrieve filter values. Writing custom SQL for Filter Dropdown Objects is the same as writing Custom SQL Data Objects.
Note
The filter dropdown object data source should return values faster than it’s corresponding “parent” data object. Therefore, .NET Assembly data sources are not recommended as Filter Dropdown Object data sources.
To remove a Filter Dropdown object, click the Deleteicon.
For more information, review the Filter Dropdown Objects section at the bottom of this article.
Interactive Filtering in Database v2021.1+
When True, Dashboards incorporating interactive filters will filter in the Data Source instead of in-memory, which can reduce execution time and can reduce the number of calls to the Data Source.
When False, the feature is disabled. Dashboards will do all filtering in-memory. Exago will first need to read the filter values by executing the tile, then re-execute the tile with the filter applied. This is the pre-v2021.1 behavior.
The default value is True.
In certain circumstances such as for Stored Procedures, Functions, Custom SQL Objects or Views that take a long time to execute, it may be desirable to disable filtering in the Data Source for an individual data object. This feature should not be disabled in general for these types of objects as they may perform well when collecting filter values or other limited sets of data. Use cases will need to be evaluated individually.
Example Scenarios
Exago suggests setting Interactive Filtering in Database to False on the Data Object level for:
A Custom SQL Object that creates a lot of internal joins in the database and requires substantial amounts of memory and/or time to execute.
A Custom SQL Object whose performance is not affected in any significant way by the presence of hard filters.
Limitations
Even when Interactive Filtering in Database is True, Exago will bypass this function when one or more of the following conditions are met:
the filter affects a report with a visible Detail section. In this case, the values in the Detail section will be utilized for the filter values
the filter affects a report that references a Data Source that Exago does not generate SQL to query
Suppress Sort and Filter v2018.1+
If this object is a programmable object (Stored Procedure or .NET Assembly Method), select whether to suppress the application sorting and filtering for report execution queries. Enable this if the programmable object uses Programmable Object parameters to do sorting and filtering in code, as application processing would be redundant and unnecessary. This can allow for better performance for programmable objects.
Note
If the application requires sorting/filtering in memory, it will not be suppressed. For instance, a report with this object has a cross-source join, an advanced join, a Cartesian join, or a formula sort or filter. Multiple tables from the same programmable data object can be joined with suppressed filtering & sorting if this setting is enabled for all of them.
Filter Dropdown Objects
The Filter Dropdown Object overrides the source of values that populate a filter value dropdown in the user interface (e.g. in a prompting filter dialog; in the Filters dialog in the Report, Dashboard or ExpressView Designer; in the Dashboard or Report Viewer).
Filter Dropdown in the Dashboard Viewer
Filter Dropdown in the ExpressView Designer
Filter Dropdown in the Simple Filter Window of the Report Viewer
By default, filter value dropdowns populate with data from their corresponding data object. Explicitly defining a Filter Dropdown Object in the configuration allows those default values to be replaced by another table, view or by custom SQL statements. This substitution happens transparently to the end user.
Specifying a Filter Dropdown Object may be most useful when the corresponding data object is a Stored Procedure, Web Service, or .NET Assembly that takes more than a few seconds to return data, as this can adversely affect user experience. Filter Dropdown Objects may also be useful when explicitly controlling filter values available to end users is desired (see Caution below).
Note
Using a Filter Dropdown Object requires General > Filter Settings > Read Database for Filter Values to be True.
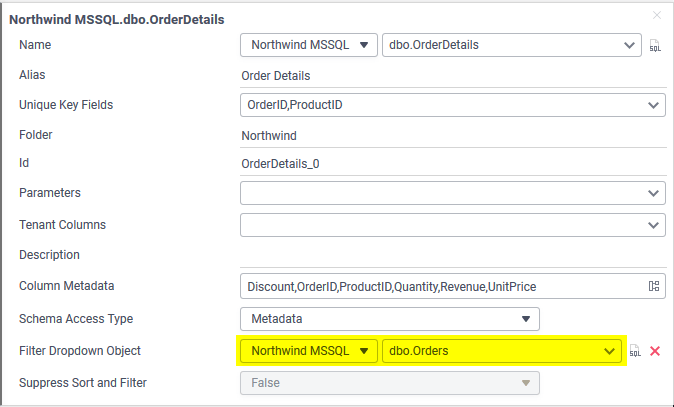
Filter Dropdown Objects may reference Data Sources other than their corresponding data object but there must be an identical column in the source data object and the Filter Dropdown Object.
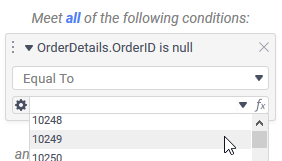
For example, consider the Orders and OrderDetails tables of the Northwind sample data set. If the Orders table is used as the Filter Dropdown Object for the OrderDetails table, and a filter is created on the OrderId field, the Filter Dropdown Object will work since both tables contain an integer typeOrderId field.
Setting Filter Dropdown Object for Northwind.OrderDetails table
Although not obvious in the figure, the order ID numbers (e.g. 10248, 10249, 10250) in the ExpressView filter dropdown below are read from the Orders table since it is the Filter Dropdown Object for OrderDetails.
On the contrary, there is no Quantity column in the Orders table. When attempting to filter on OrderDetails.Quantity, an error message will be displayed to the end user.
To prevent users from filtering on fields that are not available in the Filter Dropdown Object, set the Filterable property in the Filter Dropdown Object’s Column Metadata to False. Note that this will prevent all filtering on that field through the user interface. Filters on the column may still be added via one of the APIs.
Caution
Filter Dropdown Objects will completely replace the available filter dropdown values for their corresponding data object. If the Filter Dropdown Object has less or more values than its corresponding data object, users may not be able to filter on all possible values or be able to select values that do not correlate with records in the corresponding object.
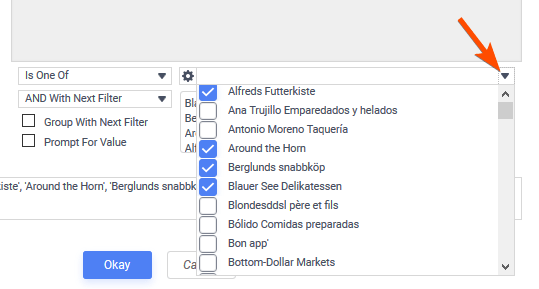
The figure below demonstrates a less than ideal Filter Dropdown Object—the object only contains three Order IDs despite there being many more in the OrderDetails table, as well as an Order ID that does not exist in the OrderDetails table (i.e. 9999999). A user would only be able to filter by order ID 10248 or 10249.
Stored Procedures offer the ability to use high level code to modify the data set before it is sent to Exago.
For best performance, stored procedures should know what sorts and filters the user has set and whether to return the schema, a single column, or the entire data set. To accomplish this:
Use the Call Type, Filter, Column and Sort Parameters in the Programmable Object Settings. These parameters will be passed from Exago to identically named parameters in the Stored Procedure. It is highly recommended to use these parameters as they can improve performance.
Additional parameters may be passed by setting them in the Data > Object > Parameters tab for the Data Object.
Important
As noted above in the Parameters section, parameter values are passed in the order in which they are listed. It is critical to ensure that the order listed is correct.
Important Note for Microsoft SQL Server
SQL Server has an attribute called FMTONLY that must be handled by all stored procedures.
FMTONLY has two possible values:
ON: The stored procedure will only return the column schema. However all IF conditional statements are ignored and all of the code will be executed. This setting will fail if the stored procedure contains any temp tables.
OFF: The stored procedure returns all of the data and the column schema. The stored procedure will correctly execute IF conditions.
The ON setting will cause problems if there are IF conditions in the procedure; however, only using the OFF setting will hurt performance if the Call Type Parameter in the Programmable Object Settings is not used.
The following example demonstrates how to use the Call Type, Column, Filter and SortStr Parameters to improve efficiency.
As of v2019.1.11+ the Sort Parameter can be used to indicate in which direction the user is scrolling a filter dropdown. ASC indicates scrolling down or DESC indicates scrolling up.
Note
For SQL Servers, FMTONLY is set to OFF.
CREATE PROCEDURE [dbo].[sp_webrpt_person]@callType INT,@columnStr varchar(1000),@filterStr varchar(1000),@fullFilterStr varchar(1000),@sortStr varchar(1000)ASSET NOCOUNT ON /*for performance reasons */SET FMTONLY OFF /*force procedure to return data and process IF conditions */declare @sql varchar(2000)declare @columnInfo varchar(1000)declare @orderbyClause varchar(1000)declare @operator varchar(max)if @callType = 0 /*return schema; no need to return any rows */begin set @sql = 'select * from vw_webrpt_person where 0 = 1'endelseif @callType = 1 /*return all data for execution */begin set @orderbyClause = '' if @sortStr is not NULL AND @sortStr <> 'null' set @orderbyClause = ' ORDER BY ' + @sortStr set @sql = 'select ' + @columnStr + ' from vw_webrpt_person where ' + @filterStr + @orderbyClauseendelseif @callType = 2 /*return filter dropdown values; limit # rows to some value; sortStr will indicate which direction user is scrolling the dropdown*/beginset @orderByClause = '' set @operator = ' >= ' if @sortStr is not NULL AND @sortStr <> 'null' AND @sortStr <> '' Begin SET @orderByClause = ' ORDER BY ' + @sortStr END if (RIGHT(@sortStr, 4) = 'DESC')Begin SET @operator = ' <= 'END set @columnInfo = '[' + @columnStr + ']' SET @sql = 'select top 100 ' + @columnInfo + ' from Northwind.dbo.OrderDetails where ' + @columnInfo + @operator + @filterStr + ' AND ' + @fullFilterStr + @orderByClauseendexec(@sql)
Table Value Functions
Table Value Functions can be used as data objects. Any available table value functions of a data source will be displayed in the Extensions tab under Functions. Exago handles table value functions similar to views and tables except it will pass any parameters set in the Data > Object tab or in the Programmable Object Settings.
Provide a unique Object Name for the new data object. It cannot match any existing data object in the system configuration nor contain any of the following characters, including spaces: [ ] { } . , @
Choose the Data Source that this Custom SQL Object will retrieve data from. Not all data sources in the system may support Custom SQL objects.
In the large code window enter the full SQL statement. This statement will be inserted as a subquery when it is sent to the Data Source for processing.
Caution
ORDER BY clauses and Common Table Expressions are not supported in subqueries.
System variables called parameters, that change based on certain environmental situations (e.g. who is running the report) may optionally be added to the SQL statement by selecting the name from the dropdown and clicking the Add button.
Click the Test icon to check the SQL statement for validity.
Click Okay to close the Custom SQL Object dialog and continue editing the data object.
Data Object Macros
Macros can be embedded in Custom SQL Objects to make them even more dynamic. Each macro allows for different SQL to be used according to the circumstances in which the data object is being called. Below are the details and examples of available macros.
IfExecuteMode
(string trueCondition, string falseCondition)
Description
Includes the trueCondition if a user is executing a report. Includes the falseCondition if otherwise.
Example
SELECT * FROM vw_webrpt_optionee IfExecuteMode(“WHERE [State] = ‘CT'”,””)
Includes the trueCondition if dataObjectName exists inside the full Exago SQL statement to the data source. Includes the falseCondition if otherwise.
Example
SELECT * FROM vw_webrpt_optionee IfExistReportDataObject(“fn_webrpt_grant”, “JOIN ON fn_webrpt_grant…”, “”)
Data Object IDs
There are three ways in which you can utilize data object IDs.
Adding Multiple Data Objects with the Same Name
IDs distinguish Data Objects that have the same name but come from different Data Sources. When adding multiple Data Objects with the same name, make sure each data object has a unique ID.
Avoiding Issues from Changes to Object Names
Providing IDs for all the Data Objects prevents issues if the name of the underlying table, view or stored procedure is changed.
Calling a Single Web Service/.NET Assembly/Stored Procedure
Web Services, .NET Assemblies and Stored Procedures comprise a group called Programmable Objects. These objects can retrieve parameters from Exago and the host application in order to control what data is exposed to the user.
Generally for Web Services and .NET Assemblies each data object calls a distinct method. Similarly each Stored Procedure is its own data object. By using data object IDs a single method/stored procedure can be called. This method can then return data or schema based on the data object ID.
To call a single Web Service/.NET Assembly/Stored Procedure:
Example: This stored procedure uses the object ID parameter (@objectID@) to return different data/schema information for different object IDs.
ALTER PROCEDURE "dbo"." Exago_Example"@callType INT,@objectID nvarchar(max) AS
SET
NOCOUNT
ON
SET
FMTONLY OFF if@objectID='Produce'beginif@callType=0begin SELECT
ProductID,ProductName,SupplierID,UnitPrice,UnitsInStock
FROM
Products
WHERE
CategoryID=1001endelseif@callType=1begin SELECT
ProductID,ProductName,SupplierID,UnitPrice,UnitsInStock
FROM
Products
ORDER BY
ProductIDendelseif@callType=2begin SELECT
ProductID,ProductName,SupplierID,UnitPrice,UnitsInStock
FROM
Products
ORDER BY
ProductIDendendif@objectID='Orders0'beginif@callType=0begin SELECT
OrderID,OrderDate,RequiredDate,ShippedDate,CustomerID
FROM
Orders
WHERE
CustomerID=0endelseif@callType=1begin SELECT
OrderID,OrderDate,RequiredDate,ShippedDate,CustomerID
FROM
Orders
ORDER BY
OrderIDendelseif@callType=2begin SELECT
OrderID,OrderDate,RequiredDate,ShippedDate,CustomerID
FROM
Orders
ORDER BY
OrderIDendend
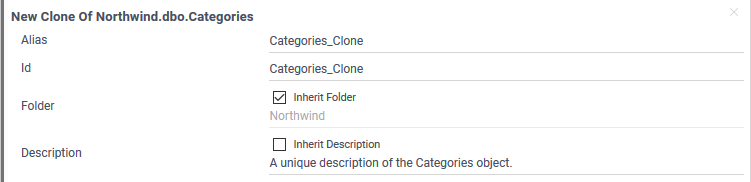
Cloning Data Objects v2019.1+
s of v2019.1+, data objects may be cloned via the Admin Console. A cloned data object inherits all its base attributes from its parent except its Alias and ID, which must be entered manually in order to create the clone.
As of v2019.2.18+, a cloned data object may have its own folder and description.
To clone a data object, right-click it and select Clone.
Enter a new Alias and ID for the cloned object.
In v2019.2.18+, select how to handle the folder and description that will be associated with this cloned object:
Inherit Folder — check this checkbox to copy the folder location of the object that this clone was created from. Uncheck to provide a different folder location in the text field below. When checked, the value copied is shown in the field below. The default value is checked.
Inherit Description — check this checkbox to copy the description text of the object that this clone was created from. Uncheck to provide a unique description in the text field below. When checked, the value copied is shown in the field below. The default value is checked.
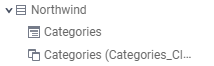
The cloned object will then appear in the Objects menu:
Functionality of Cloned Data Objects
A cloned data object is linked to its parent object. Any changes made to a parent data object will be reflected in its clone.
As of v2020.1.17+ and v2021.1.5+, cloned data objects may point to a different (but identical) object in the corresponding data source (e.g. a view, a table). This requires editing the XML configuration file. See the Data Objects section of the Config File XML Reference (All Nodes but General) article for more information.
Deleting the parent data object will also delete its linked clone.
Clones do not inherit joins from their parent objects. Joins need to be manually created between clones and other data objects.
Clones cannot be distinguished from other data objects within the report designers. There is no visual or functional difference between a cloned data object and a normal object outside of the Admin Console.
A cloned data object cannot itself be cloned or duplicated.
Column Metadata
Column metadata refers to the properties of each column in the data object.
Note
Column metadata overrides culture settings.
There are several ways to add column metadata to a data object:
Click the Read Schema button to quickly create column metadata for each column in the data object.
To remove metadata for a column, select it in the right panel and click the Delete icon.
To save changes to Column Metadata, click the Okay button. To discard the changes, click the Cancel button.
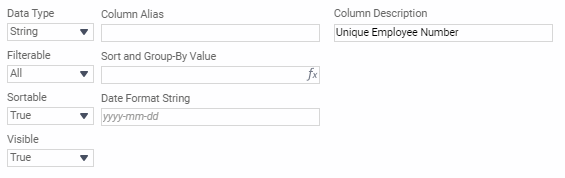
The following properties of each column can be modified:
Column Alias
The name of the data field that the end-users see.
Important
Column aliases may not contain the following characters:
{ } "
Column Description v2016.3+
Data fields can have description text added. If the data field is hovered over in a selection screen in the Report Designer, the description text will pop up in a tooltip.
Plain Text
Tooltip text can be added verbatim in the Column Description field. In-line HTML tags like <b> can also be used if desired. Press Okay when done, then Apply the change.
Language File
You can also add description elements to the language file, and reference them in the Column Description field.
In the language file, add new elements to the <AdminObjects> section using the following format:
After adding the element to the language file, add the ID string to the Column Description field. Press Okay when done, then Apply the change.
Data Type
The type of data Exago should treat the data field as any of the following valid types:
String
Date
Datetime
Time
Int
Decimal
Image
Float
Boolean
Guid
Currency
Filterable
Whether this field can be used to filter reports. The available options are:
Important
To prevent users from attempting to build a filter in the Report Designer on an unsupported data type, Filterable should be set to None if the column’s data type is not one of the supported types in the Data Type section above.
Field
Used as a Report Filter
Used as an Interactive Filter
All (True)
Yes, for the:
Advanced Report Designer
Express Report Designer
ExpressView Designer
Dashboard Designer
Scheduler
Yes, for the:
Report Viewer
Dynamic (False)
No
Yes, for the:
Report Viewer
Static (v2017.1.2+)
Yes, for the:
Advanced Report Designer
Express Report Designer
ExpressView Designer
Dashboard Designer
Scheduler
No
None (v2017.1.2+)
No
No
Note
This setting affects the availability of the column in the user interface. Filters may still be programmatically added to reports with the API regardless of the setting here.
Sortable v2016.3+
If set to False, the data field will not be listed in the Sorts menu.
Admins can now indicate whether data fields should appear in the Sorts menu using the Sortable dropdown.
Note
This toggle does not prevent data fields from being sorted by. Users can still enter the data fields manually as a formula, or use the data fields within a sort formula.
Date Format String v2019.1+
The format string for datetime data fields. Allows datetime data fields to be accurately translated from generic string columns, in order to support datetime metadata for vertical tables.
The exact form of this string is dependent on the underlying data source. Refer to the data source provider’s official documentation for more information. This transformation is supported for any data source that supports converting formulas to SQL, the most popular sources are listed here. For example:
To properly translate the HireDate column, the Date Format String would look like the following:
Data Source Type
Date Format String
Microsoft SQL Server
101
MySQL
%c/%e/%Y
PostgreSQL
FMMM/FMDD/YYYY
ORACLE
FMMM/DD/YYYY
Visible
If set to False, the data field will not be listed for users.
Sort and Group-By Value v2016.3+
Specify a custom formula by which columns should be sorted and grouped by the application. This field allows admins to specify how columns should be sorted and grouped by the application. By default, Exago will sort (and group) columns based on the data in the column. You can use this metadata field to specify different data by which the column should be sorted.
Note
As of v2019.1.1+, Sort and Group-By Values are not honored when the data field is being used within a formula sort. This change was made to prevent unexpected behavior from occurring in these instances.
For example, you may have a custom column Employees.FullName like the following:
By default, Exago would sort this field on the full string. You may want to sort on just the LastName, instead. In Sort and Group-By Value, enter {Employees.LastName}, and the column will sort on LastName.
Another common example is sorting a Month field by the numeric representation of the month instead of the name. Since this value accepts any valid Exago formula (except aggregates), custom functions can also be used.
Note
The Sort and Group-By Value field must have a one-to-one relationship with the data field. Otherwise, unexpected behavior could occur.
Custom Columns v2016.3+
Custom Columns are a way to add columns to Exago that don’t exist in the Data Source. This is completely transparent for the users; they can then use them like any other column except as noted below. New data columns can be created from composite or interpreted data fields. A formula can be used to create data from scratch. Admins often use custom columns to make popular formula sorts available on an application-wide level.
Caution
Custom columns cannot be used as filters, within aggregate formulas or as the collating field on a Chained Report.
Admin Console
To add a custom column using the Admin Console:
Expand the Data > Objects group and double-click on the desired data object, or select it and click the Edit icon.
In the Object panel that opens, in the Column Metadata field, click on the Edit Metadata icon at the end of the line to open the Column Metadata dialog box.
Click the Add New button at the bottom left of the Column Metadata dialog box. Enter a name for the new column in the dialog box.
Data Type, Column Alias, and Column Value are required fields, the others are optional.
In the Column Value field, click the Formula Editor icon to open the Formula Editor and define the data for the new column. For example, to create a new Revenue column, you might enter the formula {OrderDetails.Quantity} * {OrderDetails.UnitPrice}.
Note
The Custom Value field may only reference other fields that exist in the Data Source, and not other Custom Columns including references to itself.
Click Okay when done, then click Apply to save the new column to the configuration.
Config File
To add a Custom Column by editing the config file, open the config file in a text or xml editor. Data Objects are <entity> elements. Locate the desired entity and add a new <column_metadata> element:
<entity>
...
<column_metadata>
<col_source>ExagoFormula</col_source><col_name>FullName</col_name><col_type>string</col_type><col_alias>FullName</col_alias>
<col_description>First and Last Name</col_description>
<filterable>false</filterable>
<col_value>{Employees_0.FirstName} & ' ' & {Employees_0.LastName}</col_value>
<col_sortandgroupbyvalue>{Employees_0.LastName}</col_sortandgroupbyvalue>
</column_metadata>
</entity>
Note
Fields in bold are required.
<col_source>ExagoFormula</col_source> is static. This is the same for every <column_metadata>.
In <col_value> and <col_sortandgroupbyvalue>, data fields are identified by their ID, not their alias.
Note
The <col_value> field may only reference other fields that exist in the Data Source, and not other Custom Columns including references to itself.
Acceptable values for <col_type>: string, date, datetime, time, int, decimal, image, float, boolean, guid, currency. Save the config file when done, and restart the web server.
Examples:
There are a lot of options for what kinds of data fields you can create: Transform or interpret an existing data field:
Many of the dialogs throughout Exago require schema information such as column name, data type, filterable, sortable and visible status, sort-and-group-by value etc…. To enhance performance, schema information can be stored in the application as column metadata. Exago can then read this metadata instead of querying the data source.
Note
While storing the schema as column metadata improves performance, updates to the column metadata will be required whenever columns are added, removed, or re-titled.
Building Metadata in Bulk
The use of column metadata reduces the frequency in which the databases are queried for schema information. To make the process of adding metadata simple, this information can now be built in bulk through the Admin Console.
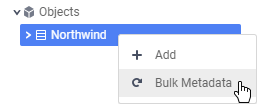
Right-click a data object, then click Bulk Metadata.
Building metadata in bulk on the Northwind data source
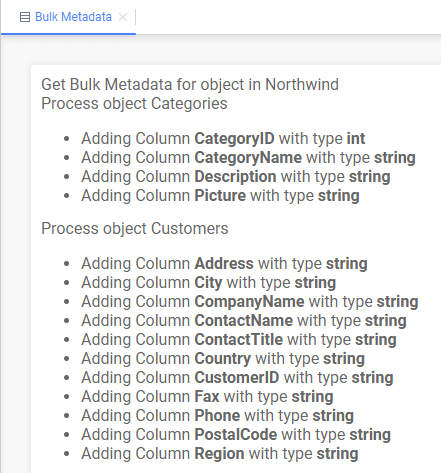
Exago will then process the information for each data object under that data source and add metadata information for each field within these objects. The Schema Access Type of each object will automatically be set to Metadata for each object.
A new Bulk Metadata tab will open in the Admin Console displaying the processing information.
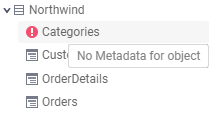
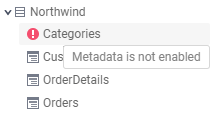
The metadata information that has been processed and added to each data object may then be edited or removed in the Column Metadata menu.
Please note, however, that if metadata has not been added to or is not enabled for a data object, the following warning will appear next to the data object in the Admin Console. This warning serves to further encourage the use of metadata and notify the system administrator that this data object will query the database each time it requires schema information.
Building Metadata Manually
In versions prior to v2019.1, data sources are queried for schema information by default. This process, however, may cause performance issues if the data sources take a considerable amount of time to return the schema. To avoid these performance issues, metadata may be added manually via the Column Metadata menu.
For Exago to retrieve schema information from the metadata:
In Other Settings, set Schema Access Type to Metadata. This will force Exago to get all schema information from the metadata for all data objects.
Note
Alternatively this setting can be overwritten for individual data objects by setting the Schema Access Type property.
Click the Read Schema button. A message will appear asking you to confirm you want to continue. Click Okay.
Click Okay to close the Column Metadata menu.
Press Okay or Apply to save the data objects.
Note
Other metadata options such as aliasing can still be utilized.
Reading Images from a Database
Exago can read images from a database and load them directly into a cell of a report. When images are stored in a database as a binary string there are two ways that Exago can load them into a report.
Place the data field containing the images into the desired cell of a report. Upon execution the images will be loaded into the cell.
Without changing Column Metadata
Place the data field that contains the images into the LoadImage function. Upon execution Exago will interpret the binary and load the images into the cell.
Table of Contents
The (SaaS) CEO’s Guide to Surviving the Great Resignation
Live Panel | Thursday, November 11th, 2021 | 2 PM Est
There are two great teachers of perseverance in this world: sales and distance running. Kevin LaFrazia does both.
Kevin has finished an incredible 18 5Ks, 14 half marathons, and 3 marathons from Florida to California, including the completion of the Disney Coast to Coast series of races in 2015! 🏃🎽😲🤯
Reaching these milestones has taken a ton of dedication, and the grit has come in handy in Kevin’s sales career. He hadn’t even been sure it was the field for him at first, but his dad had always made the job seem fun, somehow.
“It was because he was being himself,” says Kevin. “He just let himself go through sales conversations as a person. I don’t think anyone could have ever told me anything more valuable.” 😊
Being a person has served Kevin well. It’s how he accesses his sense of humor during grueling races and high-stakes phone calls. Take those moments too seriously, and you end up getting in your own way. Find a way to laugh, and, he says, “you’ll be unstoppable.”
Kevin joined our #humansofexago earlier this summer and already feels comfortable in the application he sells. “Knowing the software makes connecting with leads smoother and more conversational.” He’s also enjoyed collaborating with a growing team of SDRs whose “commitment and confidence is so wonderfully heartening.” 💛
When Kevin isn’t reveling in his number-one non-food indulgence, travel, he’s home with his wife, five cats, and surprisingly prolific, ever-expanding school of fish.
 Data >
  Objects settings.
 Objects in the Main Menu and either:
 icon at the top of the main menu
 Add from the context menu
 Clone from the context menu
 icon at the top of the main menu
 Edit from the context menu
 icon at the top of the main menu
 Delete from the context menu
 icon next to the Data Sources dropdown. For more details see Custom SQL Objects.
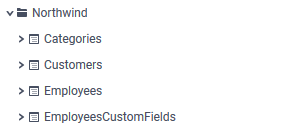
 Add button and select the parameter from the drop-down list. For more information see Stored Procedures and Web Services & .NET Assemblies.
 Data Fields Pane, the description text will pop up in a tooltip.
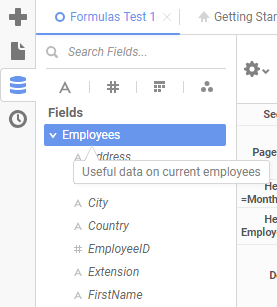
 icon to write custom SQL statements to retrieve filter values. Writing custom SQL for Filter Dropdown Objects is the same as writing
  icon.
icon.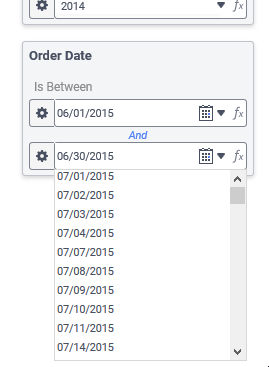

 Extensions tab under
  Functions. Exago handles table value functions similar to views and tables except it will pass any parameters set in the
  Object tab or in the Programmable Object Settings.
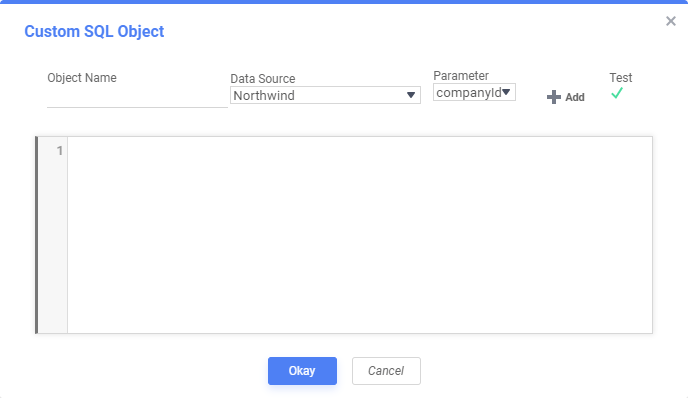
 Add button.
 icon to check the SQL statement for validity.
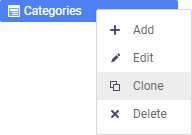

 Read Schema button to quickly create column metadata for each column in the data object.
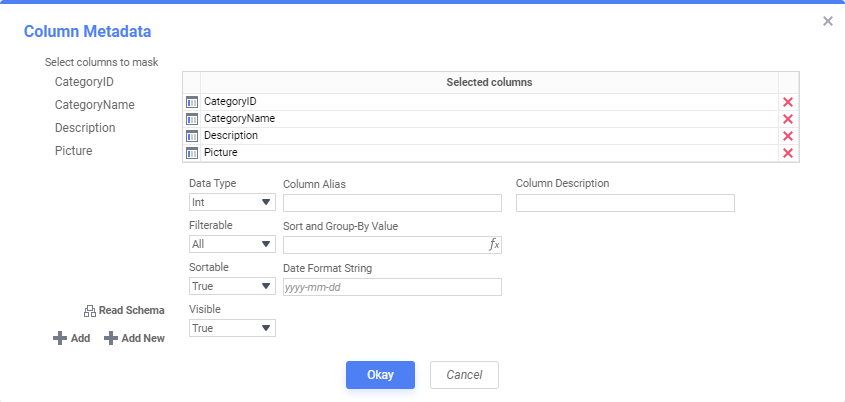

 icon.
icon. icon at the end of the line to open the Column Metadata dialog box.
 icon to open the Formula Editor and define the data for the new column. For example, to create a new Revenue column, you might enter the formula