Scheduling Reports
Use the Scheduler Service to execute reports and Dashboards regularly at specified times and sending e-mails directly from within the application. This can be useful for reports based on periods of time, such as weekly sales reports or quarterly earnings reports. Batch schedules (also called report bursting) add an additional layer of personalization by linking in a data field for each recipient.
Note
The Scheduler Service is an optional feature. Check with the system administrator for more information.
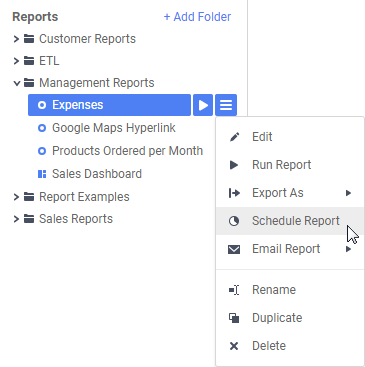
Choosing to schedule the Expenses report from the Report Tree’s context menu
Creating a Schedule
Schedules are created and edited with the Schedule Report Wizard.
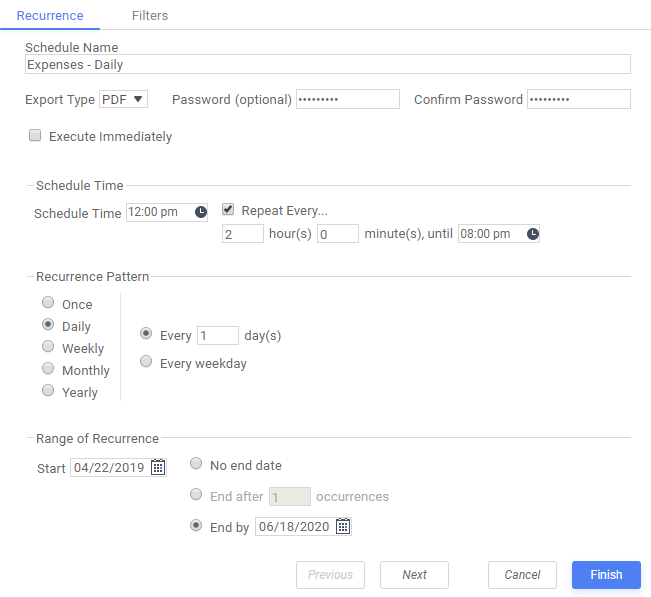
Scheduling a report for daily expenses to run every 2 hours every day of the week until 6/18/2020
To schedule a report:
- Choose the report to schedule in the
 Report Tree then start the Schedule Report Wizard by either:
- right-clicking on it then clicking Schedule Report
- clicking the Menu icon and then clicking Schedule Report.
- right-clicking on it then clicking
- Enter a user-friendly Schedule Name. The Schedule Name is displayed in the Schedule Manager.
- Select an Export Type to choose which file type to save the report as. Dashboards have two PDF output options: either as a Chained Report or as a Snapshot as it appears on screen.
- Optional: For PDF or Excel export types, enter a Password to secure the output file.
- Select a date and time for the schedule, and how often it should run:
- In the Schedule Time field, enter a time for when the schedule should run.
- Optional: To run the schedule as soon as it is created, select the Execute Immediately check box. This schedule cannot be given a recurrence pattern. Go to step 6.
- Optional: To run the schedule multiple times per day, check the Repeat Every check box and enter a time for how often it should repeat.
- Optional: To run the schedule multiple days, choose a Recurrence Pattern from the available options:
- Daily — the schedule repeats every day, every weekday, or every number of days. Enter a number of days for how often the schedule should repeat, or select Every weekday to run it every Monday–Friday.
- Weekly — the schedule repeats every week, or every number of weeks on one or more days. Enter a number of weeks for how often the schedule should repeat, and select one or more days when it should run.
- Monthly — the schedule will repeat every month, or every number of months, on a certain day. Enter a day for when the schedule should run, and a number of months for how often it should repeat.
- Yearly — the schedule will repeat every year on a certain day. Enter a day for when the schedule should run.
- Optional: If you have entered a recurrence pattern, enter a date for when the schedule should Start.
- Optional: To add filters to the report click the Filters tab. If the report already has filters you can set their values here. See Filters for instructions.
Note
In versions prior to v2018.2, Chained Reports do not support scheduled filters.
- Optional: To email this schedule to addresses from a database, see Emailing personalized reports.
- Click the Recipients tab. To send the report to a list of email addresses, select the Email Reports check box and fill out the following fields:
- Enter the recipients’ email addresses in the To, Cc, and Bcc fields. Separate multiple e-mail addresses with a semicolon.
- Optional: Enter an email subject in the Subject field.
- Optional: Enter an email message in the large text field.
If you do not want to email the report, uncheck the Email Reports checkbox. The report will be saved to disk instead. You may have to ask your system administrator for the file location.
Note
To save the report to a repository instead of e-mailing it, review the Saving Reports to a Repository section below.
- Optional: If this is a batch schedule, an Attach Report Output to Email check box is available. Clear this check box if you want to use this report to send alerts, and you do not want to email the report itself.
- To execute a test run before finalizing the schedule, click the Test E-Mail button.
- The Test Recipients textbox will be pre-filled with the e-mail addresses from the To: field. Add, edit or delete e-mail addresses to send the test to in this textbox.
- Click Send to send the schedule’s email now. This is generally used to check the email’s content and formatting.
Test message sent successfully confirmation dialog
- Click Finish to save the schedule.
 Report Tree then start the Schedule Report Wizard by either:
 Schedule Report
 icon and then clicking
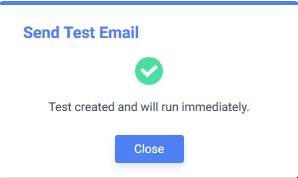
Schedules can be edited after they are created. See Viewing and Editing Schedules below for more information.
Saving Reports to a Repository
In addition to being emailed, Scheduled Reports can be set to run and automatically saved to a specific location. This can be useful for users who wish to automate certain report executions but do not wish to add extra clutter to an email inbox.
To send Scheduled Reports to a repository instead of a recipient via email, simply uncheck the ‘Email Reports’ option in the Recipients tab when creating a new Scheduled Report.
Note
The availability of the Email Results checkbox is determined by the system administrator, so it may not be available in every environment.
Batch Emailing Personalized Reports
Batch scheduling or bursting can send personalized versions of reports to a list of email addresses. The addresses must be defined in a data object, the unique key of which is used as a blanket filter for the report. Each recipient receives a customized version, filtered by their unique key.
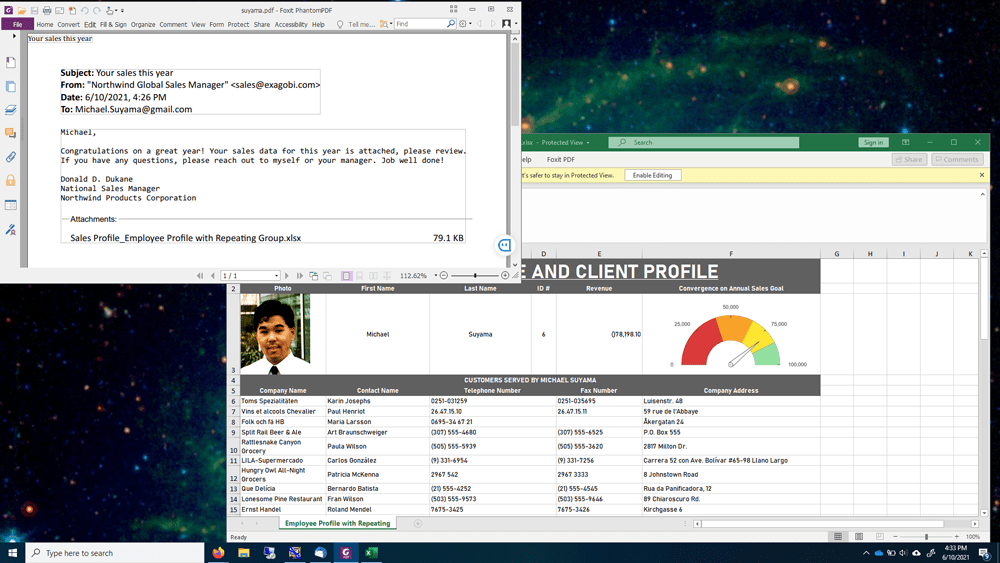
Example of customized e-mail message and filtered report sent to two unique recipients of a batch schedule, this one is for Michael Suyama

This second report output is customized for Steven Buchanan
In order for batch scheduling to work properly, it requires access to a data object with a column of email addresses that must be either located within or joinable to the underlying table. This data object can be added in the Data Objects menu of the report. If this column does not exist, the report will abend with the following error:
System.Exception: Batch email column has no join logic to attach to report.
Note
The data object containing the email addresses does not need to be added to the report itself.
To make a batch schedule:
- In the Schedule Report Wizard, click the Batch tab.
- Check the Run as Batch Report check box.
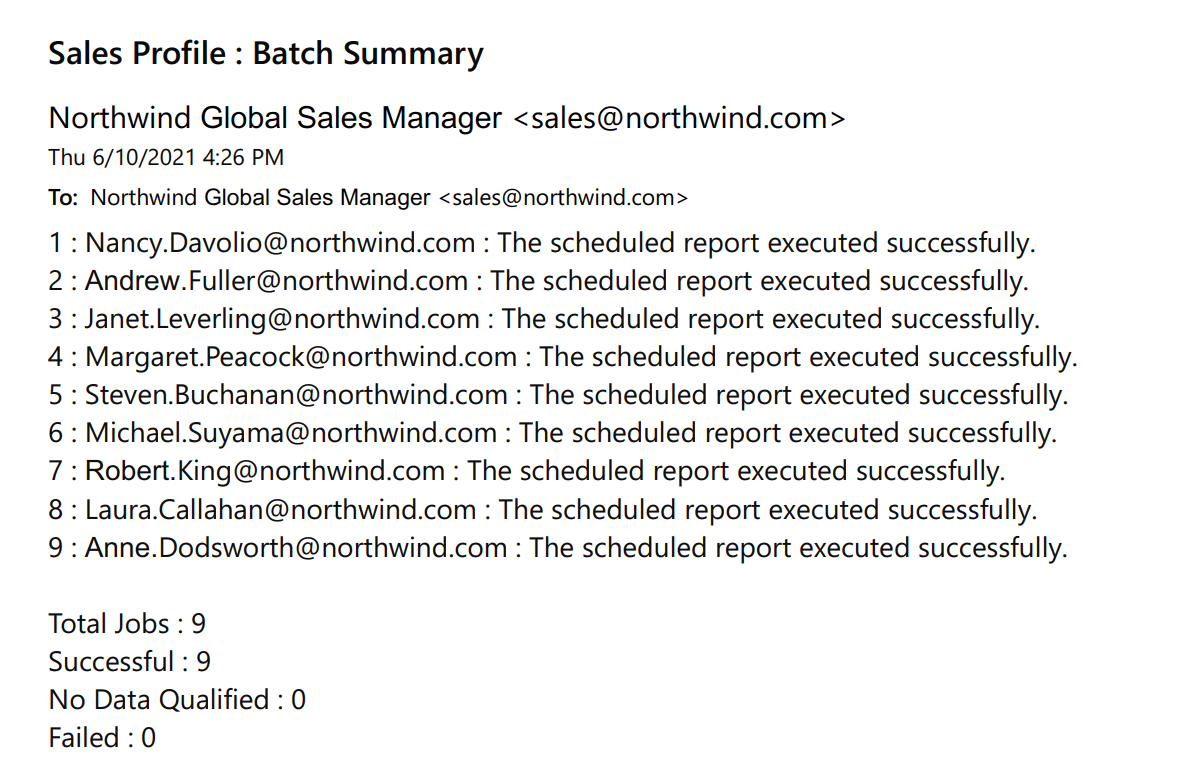
- Optional: In the To and Cc fields, enter addresses to send a summary email for each completed execution.
Example batch summary e-mail
- From the Batch Email Field list, select the data field containing the email addresses for this schedule. Fields can contain a list of email addresses, separated by semicolons (;).
- Optional: Click the Recipients tab to enter a subject and message for the batch email.
You can reference data values from the email address data row in the message body. Type the parameter @batch_column@, where column is the name of a data field in the address category (in lowercase text). The value of the field replaces the parameter text in the message output.
Tip
The To, Cc, and Bcc fields are unavailable when using Batch. Dashboards can not be scheduled as a Batch report.
Emailing a Report Immediately
Note
This feature can be disabled by the system administrator, it may not be available in every environment.
In addition to creating a recurring schedule, the application provides the option to email a report immediately directly from the Report Tree.
To do this, select the desired report to email and select the Email Report option from the context menu. Users are then prompted to fill out the email address and select the output format for the report. Only the export types available for a report can be selected from the list. If a report has no export types, it may not be emailed.

Sending an report as a PDF immediately to [email protected]
Schedule Manager
Click the Schedule Manager  icon on the application’s main menu to open the Schedule Manager. Depending on system configuration, you may be able to see reports scheduled by other users. Ask your system administrator for more information.
- Search for a schedule, report name, company ID or user ID with the Search schedules… field at the top of the tab.
- Click Refresh to reload all of the available schedule information from all of the Scheduler Services
- Click Flush to clear any completed, deleted, abended or aborted from the Scheduler Manager view and the Scheduler Services working directories
 to reload all of the available schedule information from all of the Scheduler Services
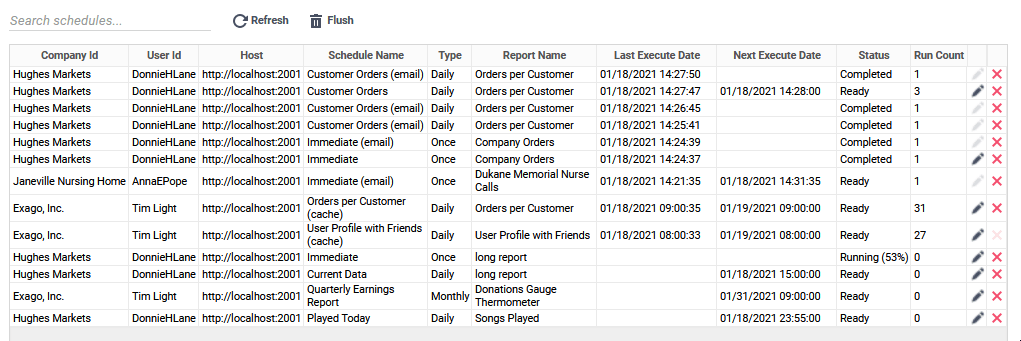
Example of a Scheduler Manager view for multiple users showing several jobs, some completed, some ready to run and some currently in execution
Each scheduled event is on a row with its most recent and forthcoming run times and a status indicating its condition:
- Ready — this schedule will run at the next scheduled execution time.
- Running — this schedule is currently executing
- Transmitting — this scheduled event has finished running, and the report is being sent to its recipients
- Completed — this schedule has completed its final event, and will not run again. It will be removed from the list when the cache is flushed.
- Deleted — this schedule has been deleted, and will be removed from the list when the cache is flushed.
- Abended — the last run failed due to an error. The schedule will not run again.
- User Aborted — this schedule is running, but it was requested to be canceled. It will be marked as Deleted.
Scheduled events which have passed are copied to their own row, so that there is a log of previous run times, with a disposition after their name. Event dispositions may be:
(archive)— a completed execution of a scheduled report that was saved to disk(email)— a completed execution of a scheduled report that was emailed(cache)— an Execution Cache job(test)— a schedule test triggered with the Test Email button v2019.2.2+
Deleting these rows does not affect the main schedule. These rows are cleared when the cache is flushed, either automatically or by clicking the Flush  icon.
icon.
Editing, Deleting and Managing Schedules
To edit an existing schedule click the Edit ![]() icon at the end of the row. Changes to the recurrence pattern will affect all forthcoming run times. You can reuse or reset deleted or completed schedules by editing them. This will reset their status to Ready.
icon at the end of the row. Changes to the recurrence pattern will affect all forthcoming run times. You can reuse or reset deleted or completed schedules by editing them. This will reset their status to Ready.
To delete a schedule click the Delete  icon at the end of the row. This sets its status to Deleted. If the schedule is already marked as Deleted, this removes the schedule from the list.
Completed and canceled schedules and archives may be periodically removed from the list by the Scheduler Service’s automatic cleanup routine. Click Flush to clear the Scheduler cache and remove them immediately.
