Storage Management: Utility (v2021.1+)
Exago provides the Storage Management Utility (SMU) to view and manage the content access records and permissions on content items at a low level. Based on .NET Core 3.1, it will run on supported versions of Windows, Mac and Linux. It is only available in English language. The SMU can be downloaded from the Downloads page on our Support Site.
Recommended Reading
The following articles on the Exago Support Site provide background information for the Storage Management system:
- Storage Management: Introduction
- Storage Management: Database Schema
- Storage Management: Admin Console
Installation
There are no pre-requisties for using the Storage Management Utility. The download includes all drivers and runtimes necessary. The operating system must be compatible with .NET Core 3.1+.
- From the Downloads page on the Support Center, download the correct version for the operating system in use.
- Extract the file to an easy to remember location.
Tip
Create a new directory in the Exago installation directory, e.g.
C:Program FilesExagoSMUor/opt/Exago/SMU - Change directories to the location of the extracted files. Execute StorageMgmtUtility.exe.
Configuration
Initial Setup
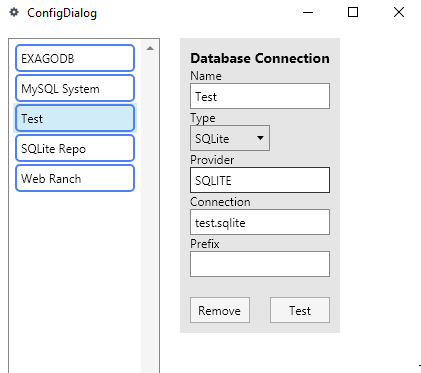
When first launched, the Storage Management Utility must be configured to connect to the Storage Management database.
- On the menu bar, click on Config to open the Options dialog.
- In the list of profiles on the left, click either New profile to load the default profile.
- In the Database Connection section on the right, enter in the details to connect to the Storage Management database. These values can be found in the Exago Admin Console > Storage Management section.
- Name — enter a friendly name to reference this profile.
- Type — select the type of database either Microsoft SQL Server, MySQL, SQLite, Oracle or PostgreSQL
- Provider — enter the database provider (driver) to use to connect to the database. Choosing a Type above will suggest a provider to use automatically
- Connection — enter the connection string to connect to the Storage Management database
- Prefix — enter the table prefix, if applicable
- Click Test to test the connection to the database server. If successful, the utility will respond with the number of records in the content, content access and party type tables.
- Click Ok to choose the profile and close the Options dialog.
The configuration file is saved to a local application data directory that will vary with operating system. Use the ConfigDir menu bar item to retrieve the location of the configuration file directory.
The utility will also save the last 10 saves to this configuration file for version control, backup and recovery purposes. Files will be saved.
Subsequent starts of the Storage Management Utility will load the last selected profile automatically.
Managing Profiles
Any number of database profiles may be saved in the configuration and recalled at a later time.
Creating a New Profile
- On the menu bar, click on Config to open the Config dialog.
- Click New to create a new profile.
- Resume from Step 3 in the Initial Setup section above.
Editing a Profile
- On the menu bar, click on Config to open the Config dialog.
- Select a profile from the list by clicking on it. The currently active profile always appears at the top of the list.

- Make changes as desired.
- Click Ok to save the changes to the profile.
Deleting a Profile
- On the menu bar, click on Config to open the Config dialog.
- Select a profile from the list by clicking on it.
- Click Remove.
User Interface
Menu Bar

The Menu Bar contains four clickable options to control the application:
- Reload — connect to the Storage Management database and refresh the Content Tree with its content. Any unsaved changes are discarded.
- Config — open the Options dialog to create, edit or view configuration profiles
- Filter — filter the items in the Content Tree by name, content ID, content type, report type, deleted or empty status. More information is in the Filtering the Content Tree section below.
- ConfigDir — open a dialog that displays the location of the connection configuration file, with an option to the open the directory
Content Tree
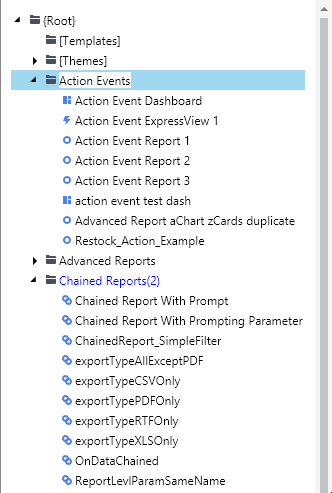
The left side of the SMU window is the Content Tree. The Content Tree lists all of the content items in the database’s content table in alphabetical order. The tree is refreshed when the Reload item is clicked on the menu bar.
Content in the tree is identified by icons:
- — this item is a folder
- — this item is an Advanced Report or a CrossTab
- — this item is a Chained Report
- — this item is a Dashboard
- — this item is an Express Report
- — this item is an ExpressView
- — this item is a theme
- — this item is a document template
 — this item is a folder
 — this item is an Advanced Report or a CrossTab
 — this item is a Chained Report
 — this item is a Dashboard
 — this item is an Express Report
 — this item is an ExpressView
 — this item is a theme
 — this item is a document template
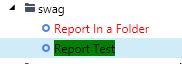
Items that appear with red text have been deleted by the content owner (the deleted flag is true).
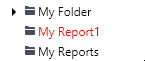
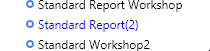
Items that appear with blue text followed by a number indicate that there are multiple content access rtecords for that item.
Items that appear with green background text indicate unsaved changes to one or more content access records. See 3. Access Rights and 4. Other Access for more information.
The top of of the Content Tree will always have a folder name {Root}, which is the parent of all other content items in the system. Clicking on any item in the Content Tree except for the {Root} will load the details for that content item into the Detail Pane on the right side of the window.
Themes and template files will appear in “pseudo folders”, named [Themes] and [Templates] respectively. These folders do not actually exist, they only appear in the Storage Management Utility for organization purposes. Themes and templates are actually stored in the root directory in the Storage Management database.
Right-clicking on items in the content tree opens a context-menu with additional options:

- Add Folder — add a new child sub folder to this folder
Caution
New folders are created with only a single content record, regardless of the Inherit Flag on its parent or other configuration. Setting content access records for new folders manually is required when creating folders with the utility.
- Delete Folder — expunge the folder from the database, folder must be empty before it can be removed.
- Hide Deleted/Show Deleted — hide all content that is marked deleted from the content tree, or show it again if its already hidden
- Hide Empty/Show Empty — hide empty folders, or show them again if already hidden
- Expand Tree — expand this folder and all its child folders
- Collapse Tree — collapse this folder and all its child folders
 Delete Folder — expunge the folder from the database, folder must be empty before it can be removed.
Filtering the Content Tree
To filter the items displayed in the Content Tree:
- Click Filter in the Title and Menu Bar to open the Filter Criteria dialog.
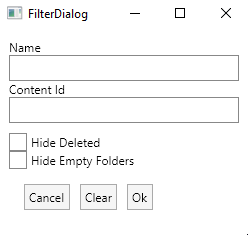
- Enter one or more criteria to filter by:
- Name — the name of the item as it appears in the Exago BI application
- Content Id — the GUID that uniquely identifies this content item in the system
- Hide Deleted — check this checkbox to hide any content items that have been marked deleted by the content owner (i.e. the item’s deleted flag is true). Items individually deleted by non-owners will still appear as content access records.
- Hide Empty Folders — check this checkbox to hide folders that appear empty in the Content Tree. A folder is considered empty if it contains no content or if other filter criteria hides any content.
- Click the Ok button to apply the filters to the content tree, Clear to remove all filter criteria selections or click Cancel to close the dialog without changing the filters. The dialog will close.
Clearing Filters
To clear filters and show the entire Content Tree again:
- Click Filter in the Title and Menu Bar to open the Filter Criteria dialog.
- Click the Clear button. The filters will be removed and the dialog will close.
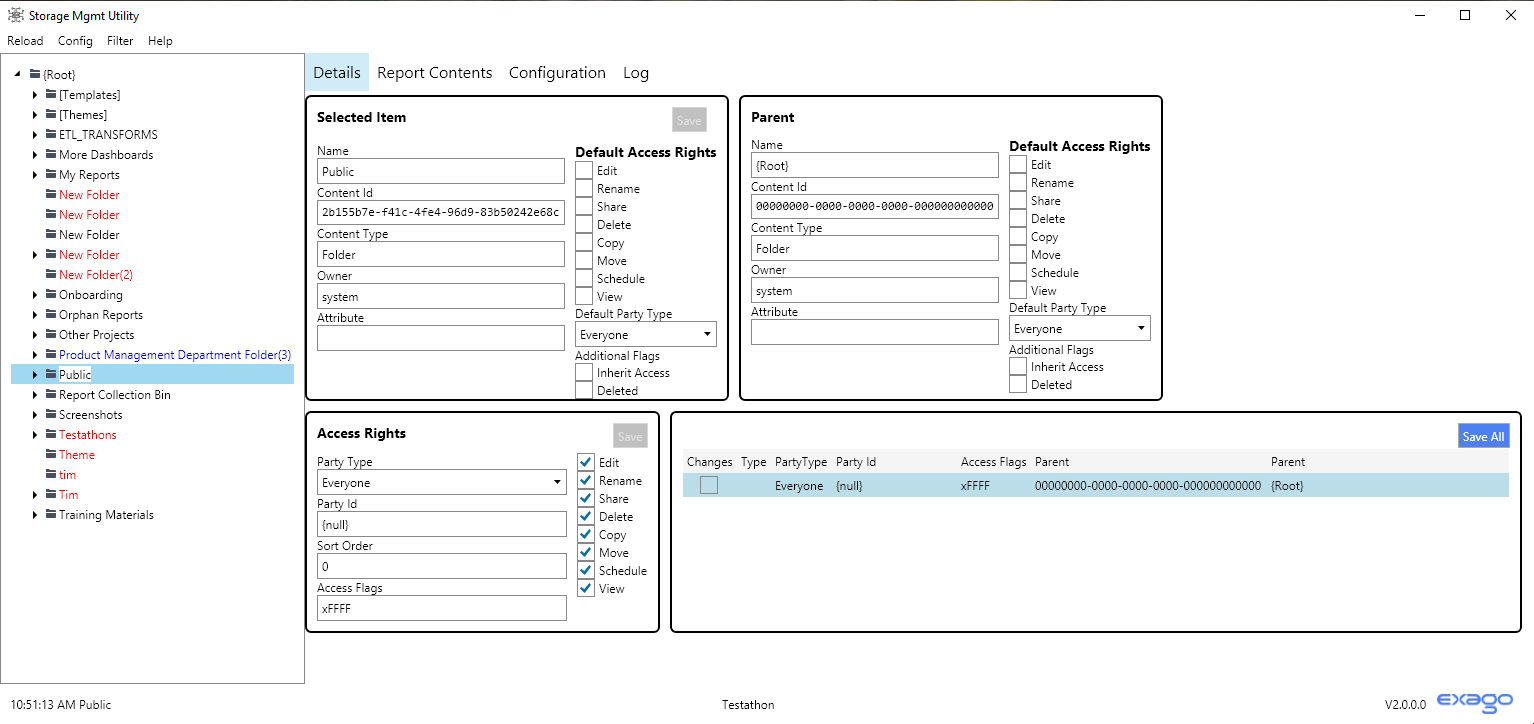
Details Pane
The right side of the SMU window is the Detail Pane. The Detail Pane allows viewing and editing of the access records for content items. It is divided into four tabs: Details, Report Contents, Configuration and Log.

Report Contents tab
The Report Contents tab displays the XML report definition content when a report is selected in the Content Tree. It is disabled if any other content type is selected.
With an XML report definition displayed, the four buttons along the top of the tab become active:
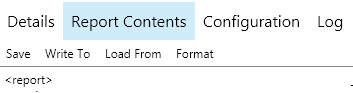
- Save — save any changes made to the XML back to the Storage Management database
- Write To — save the displayed XML content to a file on the local computer
- Load From — read an XML report definition from a file on the local computer into the Storage Management Utility
- Format — refresh the line breaks and indentation in the XML file to make it more readable. For example:
<report><main><id>d2f0fc39-9b07-4db7-9c91-713d30339b8e</id><report_name>Employee sales totals</report_name><folder_name>Training MaterialsSupport LabsLinked Reports — April 2020Employees example</folder_name><folder_id>00000000-0000-0000-0000-000000000000</folder_id><version>1</version><type>Standard</type><sql_stmt /><show_execute_form>False</show_execute_form><filter_execution_window>Default</filter_execution_window>
A portion of an Advanced Report’s XML definition before Format <report> <main> <id>d2f0fc39-9b07-4db7-9c91-713d30339b8e</id> <report_name>Employee sales totals</report_name> <folder_name>Training MaterialsSupport LabsLinked Reports — April 2020Employees example</folder_name> <folder_id>00000000-0000-0000-0000-000000000000</folder_id> <version>1</version> <type>Standard</type> <sql_stmt /> <show_execute_form>False</show_execute_form> <filter_execution_window>Default</filter_execution_window>The same report’s XML after Format
Note
Remember to click Save after loading content with the Load From function to save the content to the database.
Details tab
The Details tab displays content item information. It is further divided into four panels:
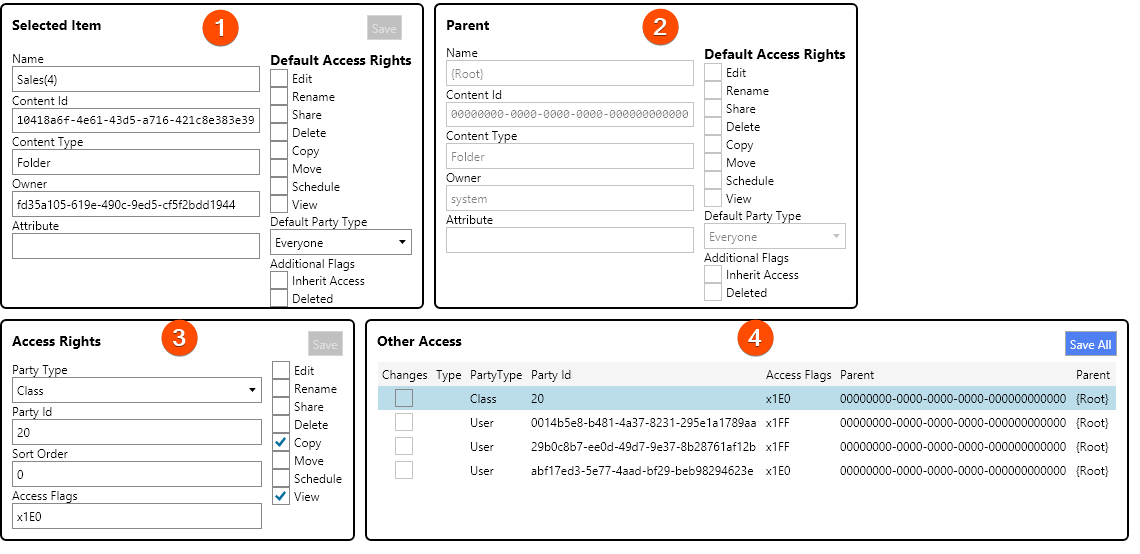
- Selected Item — displays the content metadata for the selected item, loads the content access records into the 4. Other Access panel
- Parent — displays the content metadata for the selected item’s parent item (i.e. the folder this content item is stored in) based on the currently selected 4. Other Access
- Access Rights — works in conjunction with the 4. Other Access panel to display the access rights for the currently selected access record
- Other Access — displays all of the content access records on the selected content item
1. Selected Item
The Selected Item panel displays metadata saved in the Storage Management system’s content table for the currently selected item in the Content Tree.
- Name (read-only) — the name of the item as it appears in the Exago BI application
- Content Id (read-only) — the GUID that uniquely identifies this content item in the system
- Content Type (read-only) — the type of content this item is, either Folder, Report, Theme or Template
- Report Type (read-only) — only displayed when Content Type is Report. Displays the type of report this content item is. Either Chained, Dashboard, Express, ExpressView or Advanced
Note
CrossTabs are also considered Advanced Reports.
- Owner (read-only) — the value of the Owner Id identity key when this content item was created
- Attribute (read-only) — only displayed when Content Type is Theme. Displays the component in the application the theme applies to. Either ExpressView, ExpressView_v2, Express Report, CrossTab, Chart or Map
- Default Access Rights (editable) — only applicable for folders. Displays the value for each of the Access Flags that will be applied to new content created in the folder.
- Default Party Type (editable) — only applicabler for folders. Displays the default party type that will be applied to new content created in the folder. Can be changed by selecting a different value from the dropdown.
- Additional Flags (editable) — only applicable for folders and reports. Displays or sets the values of certain flags on the content item:
- Inherit Access — only applicable for folders. Displays the value of the folder’s inherit flag which determines if content access records are copied from the folder to new content created in the folder. Can be changed by checking/unchecking the checkbox.
- Deleted — Displays the value of the item’s deleted flag which indicates the item was deleted by the content owner and should not be visible to any user of the system. Can be changed by checking/unchecking the checkbox.
- Description (read-only) — only displayed for Reports. Displays the description field for a report
- Created By (read-only) — only displayed for Reports. The value of the User Id identity key when this report was created
- Created Date (read-only) — only displayed for Reports. The UTC timestamp at the instant when this report was created
- Modified By (read-only) — only displayed for Reports. The value of the User Id identity key when this report was last saved
- Modified Date (read-only) — only displayed for Reports. The UTC timestamp at the instant when this report was last saved
If the Access Flags, Default Party Type or Additional Flags are changed, the word Changes will appear at the top of the panel. Changes can be saved by clicking on the Save button in the top right corner. Doing so will write the changes to the Storage Management database immediately.
2. Parent
The Parent panel displays metadata saved in the Storage Management system’s content table for the currently selected item’s parent in the Content Tree.
All controls in this panel are read-only. The parent of a content item can be changed by right-clicking on a content access record in the 4. Other Access panel
- Name — the name of the item as it appears in the Exago BI application, except when the parent is the root folder, when {Root} is displayed instead.
- Content Id — the GUID that uniquely identifies this content item in the system
- Content Type — the type of content this item is, either Folder, Report, Theme or Template
- Owner — the value of the Owner Id identity key when this content item was created
- Default Access Rights — only applicable for folders. Displays the value for each of the Access Flags that will be applied to new content created in the folder.
- Default Party Type — only applicable for folders. Displays the default party type that will be applied to new content created in the folder. Can be changed by selecting a different value from the dropdown.
- Additional Flags — only applicable for folders and reports. Displays or sets the values of certain flags on the content item:
- Inherit Access — only applicable for folders. Displays the value of the folder’s inherit flag which determines if content access records are copied from the folder to new content created in that folder.
- Deleted — Displays the value of the item’s deleted flag which indicates the item was deleted by the content owner and should not be visible to any user of the system.
3. Access Rights
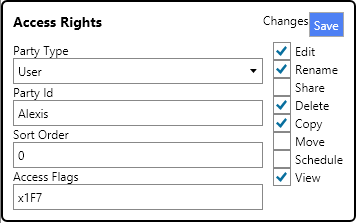
The Access Rights panel displays the party type, party id, sort order and access flags of the currently selected item in the 4. Other Access panel.
- Party Type — displays the access record’s party type. Can be changed by selecting a different value from the dropdown.
- Party Id — displays the access record’s party id. This is the value of the Party Type thay this record applies to. Can be changed by entering a new value into the textbox.
- Sort Order — displays the access record’s sort order value. Can be changed by entering a new value into the textbox.
- Access Flags — displays the access flags as a hexadecimal value. Can be changed by altering the nine checkboxes.
- Checkboxes — set or unset the various access flags.
Whenever changes are made, the word Changes will appear at the top of the panel, and the item will have a green background in the content tree. Changes can be saved by clicking on the Save button in the top right corner, doing so will write the changes to the Storage Management database immediately.
4. Other Access
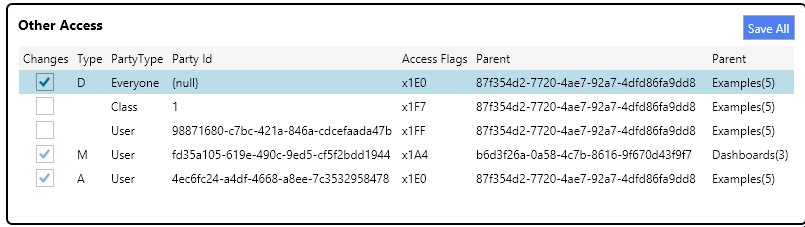
The Other Access panel displays all of the content access records that exist for a particular content item, based on the content’s content id. It also allows for adding, modifying and deleting content access records.
Clicking on any of the records in the panel will update the 3. Access Rights panel with that record’s information, as well as highlighting the location of the content item in the Content Tree. Since content can appear in different folders for different parties, it may be in different locations in the tree for different records.
- Changes — a check will appear in the checkbox if there are unsaved changes to the content access record. Click the Save All button to save them.
- Type — the type of change that will be saved to the Storage Management database upon clicking the Save button.
- A — a new contrent access record to be added
- D — this content access record will be deleted
- M — this content access record is modified
- Party Type — the party type name from the party type table that this content access record applies to
- Party Id (editable) — the value of the identity key that correlates with the Party Type that this content access record applies to
- Access Flags — displays the access flags as a hexadecimal value.
- Parent — the content ID of the parent that contains this content item for this particular party
- Parent — the name of the parent that contains this content item for this particular party
Right-clicking on items in the Other Access panel opens a context-menu with additional options:
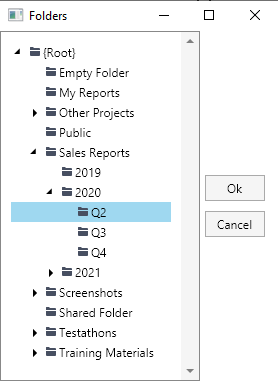
- New Access Record — create a new user level access record with a GUID as the party ID and the currently selected content access record’s parent. Modify the record with the 3. Access Rights panel and the Party Id. The new record is not saved until clicking the Save All button in the panel.
- Change Parent — change the parent of the currently selected content access record. A Folders dialog will be opened, to choose a new parent by name. Clicking Ok in the dialog will save the change to the content access immediately.
- Delete Access Record — mark the currently selected content access record for expunging from the table. No changes are made until the Save All button is clicked.
Configuration
The Configuration tab presents an editable list of the database profiles in the configuration file. Changes are stored in memory, and are only committed to the conifiguration file the next time the Ok button is clicked in the config dialog.
Log
The Log tab displays the contents of the Storage Management Utility’s log (StorageMgmtQuery.log in the utility’s installation directory). It will only show entires from the time the utility was last started.
Logging for the application may be customized by editing the log4net.config.xml file in the utility’s installation directory. See the log4net section of the Application and Performance Logging article for additional information.
Status Bar
The Status Bar at the bottom of the SMU window displays information about the utility’s communication with the Storage Management database and the local file system, the loaded configuration and the version number of the utility.

The status bar is broken up into three zones:
- Messages — accompanied with a timestamp indicating when the operation was completed
- The name of the currently loaded configuration profile. In the figure above, the currently loaded profile is named My SM Test Environment.
- The version number of the Storage Management Utility, and the Exago logo
