Advanced Reports: Report Options
The following options are available in the General Options dialog:
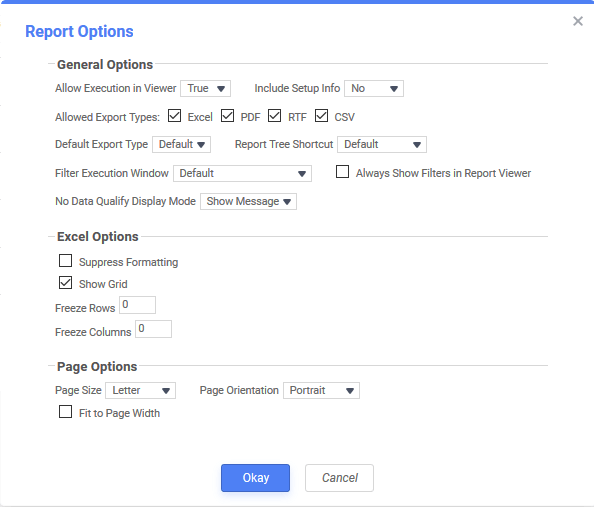
Report Options dialog
General Options
- Allow Execution in Viewer: Allow or prevent the report from being run in the Report Viewer. If set to False, this report must be exported to be viewed.
- Include Setup Info: Select Top or Bottom to display the data categories, sorts, and filters at either the beginning (Top) or end (Bottom) of the report. Select None to not show this information on the report.
- Allowed Export Types: Enable or disable output types for the report.
- Default Export Type: Specify the default output type for the report. If Default the export type is determined by the system’s configuration. This setting is used when exporting a report directly from the Report Tree, for example.
- Report Tree Shortcut: Specify whether the Run
 button for the report in the report tree runs the report in the Report Viewer or exports it in the default export type.
 - Filter Execution Window: Select which type of Filter menu displays when running the report with prompting filters:
- Default: The type of filter window is determined by the system’s configuration.
- Standard: Display the standard filter window.
- Simple with Operator: Display a simplified filter window that only allows the filter operator and value to be changed.
- Simple without Operator: Display a simplified filter window that only allows the filter value to be changed.
- Always Show Filters in Report Viewer: Show the Filter menu and allow changes to be made to the filters every time the report is run, even if there are no Prompting Filters on the report.
- No Data Qualify Display Mode: Select what to display if no data qualifies for the report.
- Show Message: Display the standard no data qualified message in a dialog box.
- Show Report: Display the Page Header, Page Footer, Report Header, and Report Footer sections of the report. Any cells containing Data Fields will not be displayed.
 button for the report in the report tree runs the report in the Report Viewer or exports it in the default export type.
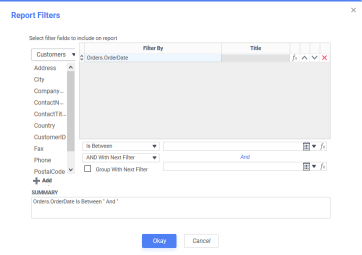
Excel Options
- Suppress Formatting: Check the checkbox to only include the data in an Excel export, without the formatting.
- Show Grid: Check the checkbox to show grid lines between cells in an Excel export.
- Freeze Rows: Freeze the top number of rows when exporting to Excel, so that the rows stay anchored to the screen when scrolling through the report.
- Freeze Columns: Freeze the left number of columns when exporting to Excel, so that the columns stay anchored to the screen when scrolling through the report.
Page Options
- Page Size — choose the page/paper size. Choices are common named US and ISO paper sizes (e.g. Letter, Legal, Tabloid, A4, etc…) The default value is Letter.
- Page Orientation — choose either Portrait or Landscape page orientation. The default is Portrait.
- Fit to Page Width — check this box to stretch the contents to the available width of the page. The default value is checked.
Report Viewer Options
The following options are available in the Report Viewer Options window:
General
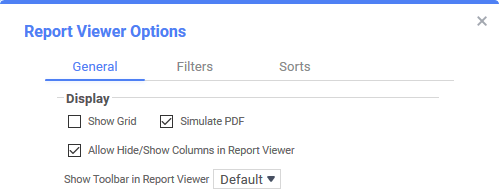
- Show Grid — Check the checkbox to show grid-lines between cells, in addition to any cells borders that have been applied in the Report Viewer.
- Simulate PDF — Check the checkbox to have the report appear as if it were on a PDF page when viewed. When unchecked, the report still is paginated but does not have the formatting of a PDF exported report.
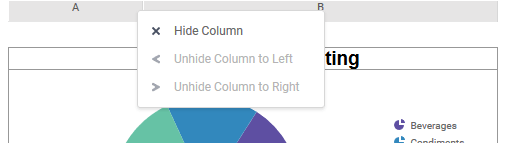
- Allow Hide/Show Columns in Report Viewer — check the checkbox if the ability to show or hide individual columns is available in the Report Viewer. If checked, headers will appear at the top of the page. When right-clicked, users will have the ability to hide or un-hide columns. If unchecked, the headers are not present and the columns may not be changed.
Note
If a CrossTab appears on the report, this setting will not have an effect.
- Show Toolbar in Report Viewer — Select whether to show or hide the interactive toolbar in the Report Viewer.
- Default: the toolbar will be displayed based on the system’s configuration
- Auto: the toolbar will be hidden if the Report Footer appears on the first page. Otherwise, the toolbar will be shown.
- Show: always show the toolbar
- Hide: always hide the toolbar
- Show Column Headers in Report Viewer (v2021.1+) — uncheck this checkbox to hide the column headers in the Report Viewer.
- Report Row Step Limit — Override the default step size for incremental loading (with a smaller value). This option is only available if Incremental Loading is enabled in your environment.


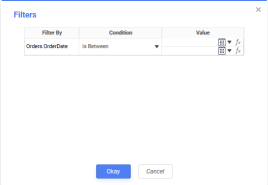
Filters
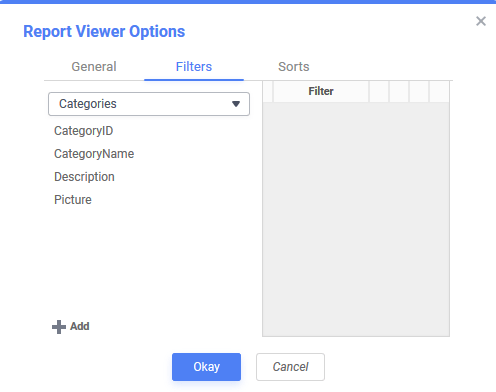
Filters tab of the Report Viewer options dialog
To allow users to select additional interactive filters in the Report Viewer, add data fields as filters. These filters are accessed by clicking on the Open Dock  (pre-v2021.1) or
  (v2021.1+) icon on the side of the screen in the Report Viewer.
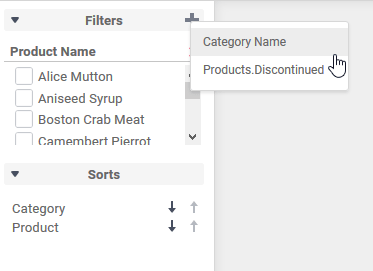
Interactive Features pane opened in the Report Viewer showing a Product Name filter, adding a Category filter and Sorts
For each filter you can select the following options:
- Title: Enter text to appear in place of the data field name.
- Type: Specify the type of ability the user has to choose filter values:
- Single Choice: A dropdown menu with all possible filter values. Users can choose one value.
- Multiple Choice: A check list with all possible filter values. Users can choose multiple values.
- Single Slider: Users can choose one value by sliding a point along a scale.
- Range Slider: Users can choose multiple values between two points on a scale.
- Value Sort Direction: Whether the filter values should display in ascending or descending order.
- Filter Value Format: Select how the filter values should display. The controls here work similar to the Cell Formatting controls.
- Initially Display Filter on Panel: Check the checkbox if the filter should appear automatically when the report is run. If unchecked, the user will need to add the filter each time the report is run.
Sorts
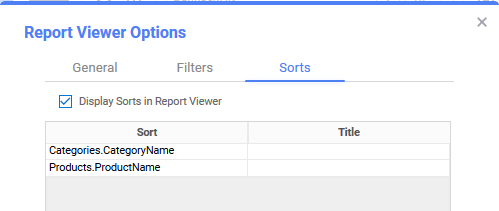
Sorts tab of Report Viewer options dialog showing two Category sorts
To allow users to change existing sorts from ascending or descending in the Report Viewer. These sorts are accessed by clicking on the Open Dock (pre-v2021.1) or (v2021.1+) icon on the side of the screen in the Report Viewer.
- Display Sorts in Report Viewer: Select whether the user can see and modify sorts in the Report Viewer.
- Title: Enter a user-friendly name for the sorting category which will be displayed in the Report Viewer.
