Adding Custom Items to the Report Tree
Note
Non-Exago content will not be executed by the Exago execution engine.
This feature allows custom items to be added to the Report Tree including interactivity with those custom items.
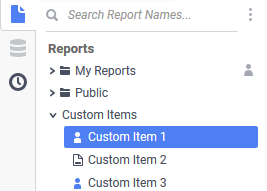
Report Tree with the custom items that will be added as part of this example
Caution
The Report Tree should contain no more than 1,000 items in it for best user experience.
Implementation
Because we intend to provide a generic solution for a variety of use cases, and because third party reports do not follow any similar standards, this functionality must be implemented on a case-by-case basis. Developers will be required to familiarize themselves with Action Events and Server Events.
The general procedure for adding external content to the report tree is outlined below. Examples of implementations of each Server and Action Event are included as starting points.
- Implement the OnAfterLoadReportsList Global Server Event
- Implement the OnSelectReport Global Action Event
- Implement the OnDoubleClickReport Global Action Event
- Optional: implement the remaining user interface Global Action Events if needed.
- OnEditReport
- OnDeleteReport
- OnRenameReport
- OnExecuteReport
Implementing step 1 is required to place the custom items into the Report Tree. Implementing steps 2 and 3 is required because without them, a warning error message will display to the user that the Action Event has not been implemented. The remaining Action Events in Step 4 are optional.
Server Event
1. OnAfterLoadReportsList
This server event requires importing the WebReports.dll library in addition to the usual WebReportsApi.dll, because the former contains the definitions of TreeNode and TreeNodeCollection, as well as CustomTreeFolder and CustomTreeNode which are used to differentiate custom nodes.
This event is called after reports have been loaded in the report tree and before the tree is drawn for the user. A WebReports.UI.Controls.TreeNodeCollection object is passed in as an argument. The collection contains WebReports.UI.Controls.TreeNode objects, one for each report or folder in the tree.
The following example demonstrates how to add three new nodes to the Report Tree with the OnAfterLoadReportsList Server Event with the Admin Console.
For more information, refer to the Server Events and Global Event: OnAfterLoadReportsList articles.
| Name | AddCustomItemsToReportTree |
|---|---|
| Global Event | OnAfterLoadReportsList |
| Language | CSharp |
| References |
|
| Namespaces |
|
Custom Code
//Get the tree object from the arguments array.TreeNodeCollection tree = (TreeNodeCollection)args[0];//Add a new folder named "Custom Items" to contain our new custom items//and then add it to the tree.TreeNode folder = new CustomTreeFolder("Custom Items");tree.Add(folder);//Add a new custom item to the folder, with the name My Test Item 0//passed into the constructor of the item. Use the iconTreeNode item0 = new CustomTreeNode("My Test Item 0");item0.ImageName = "TreeActiveRole.png";folder.Nodes.Add(item0);//Add a new custom item to the folder, with the name My Test Item 1//passed as the Text property of the itemTreeNode item1 = new CustomTreeNode();item1.Text = "My Test Item 1";item1.ImageName = "DropDownArrow.png";folder.Nodes.Add(item1);//Add a new custom item to the folder, with the name My Test Item 2TreeNode item2 = new CustomTreeNode("My Test Item 2");item2.ImageName = "TreeActiveRole.png";folder.Nodes.Add(item2);return null;
Report Tree Icons
Note
This article references
<WebApp>/as a placeholder for the Web Application’s install location. The default install location isC:Program FilesExagoExagoWeb(or/opt/Exago/on Linux); however, these directories can be changed during installation.
The image files referenced by item0.ImageName, item1.ImageName and item2.ImageName above belong to the currently active Application Theme. The Basic Application Theme icons included at installation can be found in <WebApp>/ApplicationThemes/Basic/Images/. For more information, refer to the Application Themes article. Images are available in both PNG and SVG format.
When choosing or generating images to display in the tree, we recommend selecting one that has a matching <filename>Selected.png partner. For example, Edit.png has a matching EditSelected.png. When the custom item is selected in the Report Tree, Exago will automatically substitute <fileName>Selected for the original <fileName>. If the image selected has no matching <fileName>Selected, then a broken image placeholder will be displayed in the user interface instead.
| Unselected Icon | Filename | Selected Icon | Filename |
|---|---|---|---|
 |
TreeFolder |  |
TreeFolderSelected |
 |
TreeAdvancedReport |  |
TreeAdvancedReportSelected |
 |
TreeChainedReport |  |
TreeChainedReportSelected |
 |
TreeDashboardReport |  |
TreeDashboardReportSelected |
 |
TreeExpressReport |  |
TreeExpressReportSelected |
 |
TreeExpressView |  |
TreeExpressViewSelected |
Now that the Server Event is implemented, the custom items will appear in the user interface. However, without implementing the Action Events, users cannot interact with them. In fact, without implementing at least OnSelectReport and OnDoubleClickReport, users will be presented a warning message:
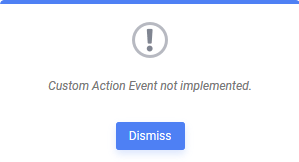
To add interactivity and prevent the warning message, implement the Action Events as outlined in the following section.
Action Events
Action Events function on a client-and-server level rather than just the server. Interface elements can be manipulated using client-side JavaScript.
Exago provides the following Global Action Events in order to extend the Report Tree interactivity. Each of these events passes a webReportsCtrl JavaScript object, which contains the full application DOM, in addition to the usual clientInfo methods:
- OnEditReport
- OnSelectReport
- OnDeleteReport
- OnRenameReport
- OnExecuteReport
- OnDoubleClickReport
- OnRightClickReport
These events require some unique handling when compared to other Action Events, as they require a boolean return value or the Promise of a boolean value. True indicates to Exago that we don’t want to continue with the “normal” course of action, which we have replaced with our custom code. False indicates that we should continue with the normal action.
For example, when double-clicking a custom Report Tree item, it might be desirable to launch an external editor instead of the Exago Report Designer. In an Action Event, check the report type, and if it is a third party report, insert the custom action then return True. If it is a regular Exago report, continue with the normal course of action by returning False.
In order for these events to be able to have a return value, they must be enclosed within a JavaScript function. To write the scripts in the Admin Console each event will need to be wrapped in an auto-executing anonymous function, like so:
string jsCode = @"(function(){/* javascript stuff; */return true;}())";sessionInfo.JavascriptAction.SetJsCode(jsCode);return sessionInfo.JavascriptAction;
The examples that follow have been formatted as anonymous functions so that they may be copied directly into the Admin Console. For more information, refer to the Action Events article.
2. OnSelectReport
The following is an example how an Action Event with Global Event Type OnSelectReport can be used to allow standard Exago behavior when a user clicks on an Exago report, but to prevent the same when clicking on a custom item.
| Name | ClickCustomItem |
|---|---|
| Event Type | None |
| Global Event Type | OnSelectReport |
| Language | CSharp |
Custom Code
string jsCode = @"(function(){var node = clientInfo.utilities.TreeCtrl.GetSelectedNode(clientInfo.webReportsCtrl.reportsTreeId);if (node === null) // The user may have right-clicked on a non-nodereturn false;return clientInfo.webReportsCtrl.ReportFoldersCtrl.IsCustom(node);}())";sessionInfo.JavascriptAction.SetJsCode(jsCode);return sessionInfo.JavascriptAction;
For additional information, refer to the Global Action Events article.
3. OnDoubleClickReport
The following is an example how an Action Event with Global Event Type OnDoubleClickReport can be used to detect whether the selected object is a custom node and launch a specific handler. The example makes use of the LoadUrlToNewTab() method in ClientInfo in order to load a new user interface tab with the content.
| Name | DoubleClickCustomItem |
|---|---|
| Event Type | None |
| Global Event Type | OnDoubleClickReport |
| Language | CSharp |
Custom Code
string jsCode = @"(function(){// Based on the node that was selected, determine if it was added as// a custom node via a server event or not;// if so, open a new tab and display contents;// otherwise, display the Exago reportvar node = clientInfo.utilities.TreeCtrl.GetSelectedNode(clientInfo.webReportsCtrl.reportsTreeId);if (node === null) // The user may have right-clicked on a non-nodereturn false;if (clientInfo.webReportsCtrl.ReportFoldersCtrl.IsCustom(node)) {var reportName = clientInfo.utilities.GetText(node);switch (reportName) {case 'My Test Item 0':clientInfo.LoadUrlToNewTab('http://localhost/handler0.aspx');break;case 'My Test Item 1':clientInfo.LoadUrlToNewTab('http://localhost/handler1.aspx');break;default:clientInfo.LoadUrlToNewTab('http://localhost/defaulthandler.aspx');break;}return true; //we're done processing select event} else {return false; //continue processing select event normally}}())";sessionInfo.JavascriptAction.SetJsCode(jsCode);return sessionInfo.JavascriptAction;
For more information, refer to the Global Action Events article.
4. OnRightClickReport
The following is an example how an Action Event with Global Event Type OnRightClickReport
can be used to allow standard Exago behavior when a user right-clicks on an Exago report, but to prevent the same when clicking on a custom item.
| Name | RightClickCustomItem |
|---|---|
| Event Type | None |
| Global Event Type | OnRightClickReport$ |
| Language | CSharp |
Custom Code
string jsCode = @"(function(){var node = clientInfo.utilities.TreeCtrl.GetSelectedNode(clientInfo.webReportsCtrl.reportsTreeId);if (node === null) // The user may have right-clicked on a non-nodereturn false;return clientInfo.webReportsCtrl.ReportFoldersCtrl.IsCustom(node);}())";sessionInfo.JavascriptAction.SetJsCode(jsCode);return sessionInfo.JavascriptAction;
4. Optional Action Events
The remaining Global Action Events are not required to permit basic interactivity with the Report Tree and custom items. Their implementation would be similar in fashion to the above examples, depending on use case.
