Getting Started with Application Themes
In this guide we’ll walk through the process of creating a new Application Theme, then demonstrate how to change images and CSS styles.
Creating an Application Theme
Important
Creating and editing app themes must be done in a test environment. Only once the app theme is finalized should it be added to a live production environment.
There are three ways to create an Exago Application Theme:
- For versions pre-v2020.1.3, automatically with the Application Theme Maker, available for download on the Downloads page of our Support Site
- For versions v2020.1.3+, automatically with the application theme maker built into the Admin Console
- Manually, following the procedure in the Manually Creating an Application Theme section below
Creating an Application Theme with the Admin Console
Note
The web server will need read/write permissions to the ApplicationThemes folder where Exago is installed.
- Point your browser to the Administration Console. By default this is http://<YourServer>/Exago/Admin.aspx. Open General Settings > Feature/UI Settings. Scroll all the way down to Application Theme Selection.
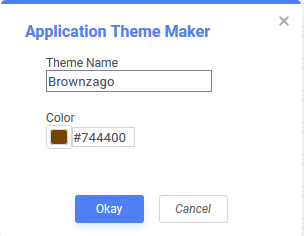
- In the dropdown, click Create New Theme… to open the Application Theme Maker dialog.

- Provide a name for the theme in the Theme Name textbox.
- Provide a color for the theme. Either enter a six-digit hexadecimal HTML color code, or click the Color Picker icon to open the color picker to visually choose a color.
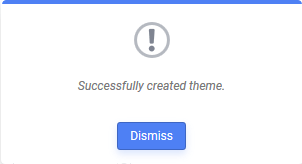
- Click Okay. Allow a few moments for the theme to be generated. Wait for the “Successfully created theme” message to appear.
- Click Apply or Okay at the bottom of the Admin Console to apply the theme.
Manually Creating an Application Theme
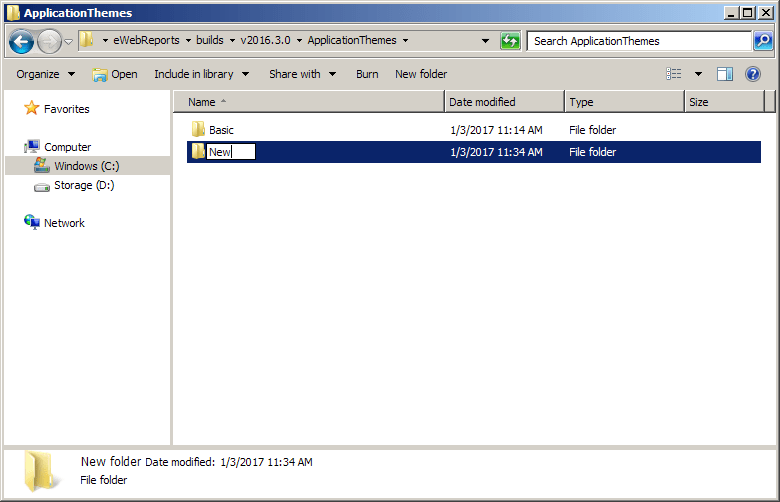
- First, navigate to the Exago directory in your test environment. The folder ApplicationThemes should be present. Double-click to enter that folder.
- In ApplicationThemes, you should see a Basic folder. This is the default Exago theme. Do not modify this folder. Instead, duplicate the Basic and then rename the copy with the name of the new theme. We’ll call our new theme “New”.
- Double-click on the new folder to enter it. Verify you see all three component folders:
- Css — Contains the CSS files
- Fonts — Contains the web fonts used in the user interface
-
Images — Contains both rasterized (
.png) and vector (.svg) versions of the icons used in the user interface
- To see the new theme in action, use the Admin Console > General > Feature/UI Settings > Application Theme Selection setting to select the theme you just added.
- Refresh your application.

Ta-da! If you don’t see any difference, that means it’s working! Why is that? Your new theme is an exact duplicate of the Basic theme. Now we’ll discuss how to add some customizations to your new app theme.
Customizing Your Application Theme
So we have a new app theme, which is now essentially a blank canvas. Two basic types of changes we can make involve Changing Images or Changing Styles. We’ll discuss easy ways to accomplish both in the following sections.
Changing Images
The first thing we need to figure out when changing images is figuring out the filename for the image in question. Sometimes we can scan the image folder and identify it at a glance. However, this may not be simple for every image. A more precise way to identify application images is to use a Web Inspector tool, which is built into most modern web browsers.
This guide uses the Google Chrome Developer Tools, but the process should be similar for other browsers.
- To get started, open Exago in your browser and navigate to a page containing the image you want to replace. Using Chrome, press F12, or Ctrl-Shift-I, or open the menu and select More tools > Developer Tools. A two-pane window will open up at the bottom of the browser tab.
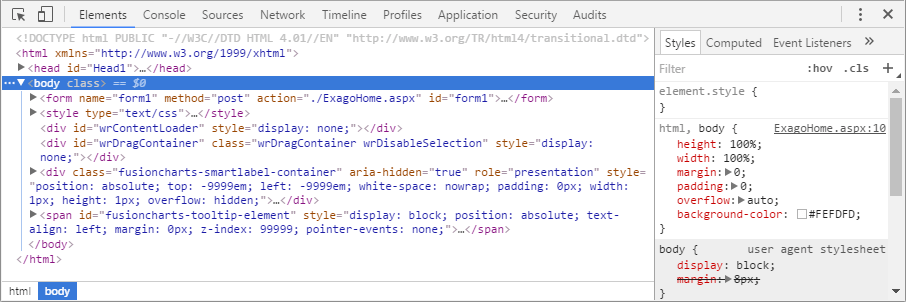
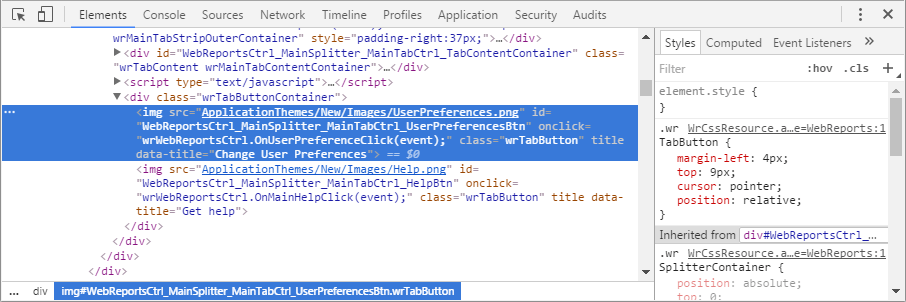
- Make sure the Elements tab and the Styles sub-tab are open. Press the Inspect button or Ctrl-Shift-C. This will temporarily turn your mouse cursor into an element inspector. Hovering over elements will display their css selector (this will be useful in the next section), and the size of the element in px. Then click on the image you want to identify.
- Look in the Elements tab of the Web Inspector. The left pane shows you the actual html being rendered at the pointer location. The element highlighted in blue is what you’ve just selected. The right pane shows the styles for that element.
- It should only take a glance to be able to determine the filename for the selected image. Look at the src property for the <img> element, which is underlined. The filename in this example is UserPreferences.png.
- Now that we know the image filename, we know how to name our replacement image. Simply take our new image, and re-name it to UserPreferences.png, then copy it into the Images folder in our New app theme. (Make sure that the new image is the same size as the old).
- Then refresh the browser:

And we’re done!
Image Defined in CSS
It may be the case where a selected image has no src attribute. This is because the image is being defined in the application CSS instead of in the HTML. If this is the case, look at the right panel’s Styles sub-tab, and scroll down until you find a background-image style.
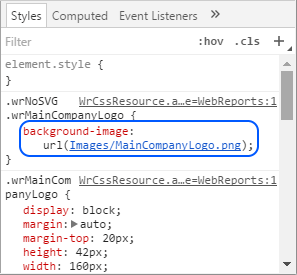
The url property for the style contains the filename. In this example, the filename is MainCompanyLogo.png. Now that we know the image filename, we know how to name our replacement image. Simply take our new image, and re-name it to MainCompanyLogo.png, then copy it into the Images folder in our New app theme. (Make sure that the new image is the same size as the old).
Note
The following steps 1–3 are only required for pre-v2018.1.
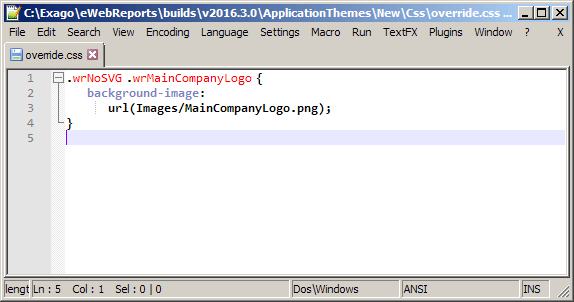
- We also have to add a custom css style for the image.
- Write down the full CSS selector which contains the background-image property. In our example:
.wrNoSVG .wrMainCompanyLogo { background-image: url(Images/MainCompanyLogo.png); } - Then all we have to do is copy this into a CSS file in your app theme. See the next section for instructions on adding CSS.
Note
We have provided an icons.css file in the Custom Theme Template (available here), which contains the css overrides for all applicable images. If you’d prefer to avoid the above steps, copy this file directly into your css directory.
Changing Styles
Any CSS added to an application theme overrides any “Basic” css for the selected elements. The question is, how do we figure out what selectors to use for specified elements.
Once again, the solution is to use a Web Inspector. Recall what happens when we hover over an element using the Inspect  tool:
tool:

You can see a tooltip pop up which shows us the element type, id, and class. This works for all elements on the page, not just images! The tooltip has three main parts:
- type in purple (before the # symbol)
- id (name) in orange (after the # symbol, but before the . symbol)
- class in blue (after the . symbol)
We recommend only using the class selector.
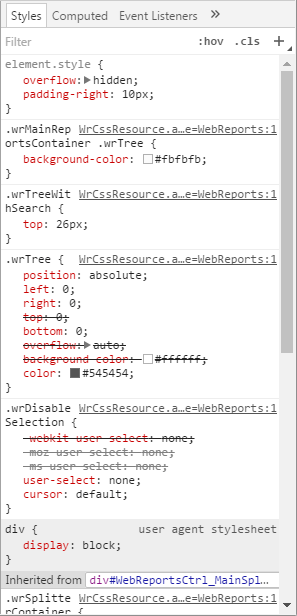
Additionally, if you click on the element using the Inspect tool, looking in the Styles window in the Developer Tools shows you the full list of CSS properties that currently apply to that element.
To add custom CSS:
- Navigate to your app theme folder, and open the css folder. Create a new text file, with any name you like, with a .css file extension.
- Then open your file in a text editor, and add your custom styles. For example:
/**
 * This CSS file will override the default settings
 * and turn the background color of the selected tab
 * a light tan color.
*/

.wrDynamicTabItemSelected {
	background-color: BlanchedAlmond;
}
Note
When adding comments within the override.css file,
/*should be used for both single and multiline comments.
block comments */ - Save the file, then clear your browser’s cache and refresh the page to see the changes applied.

