Setting up a State Server
You can create a state service on the same server as the Exago application, or on a different one.
Warning
When using any of the state server configurations below, make sure to set
cookieless="false"as the use of cookieless sessions with a state server is not supported.
ASP.NET State Service on Windows
Enable the Service
- On your state server, click Start and then Run…. Type services.msc, and click OK.
- Locate the ASP.NET State Service and check the Startup Type property. If it is not set to Automatic or Automatic (Delayed Start) then you have to enable the service.
- Right-click on it, and select Properties.
- Change the Startup Type to Automatic, then click Apply. Then click Start.
If your state server is on a network, make sure you have allowed inbound connections to the state service on a port.
Configure the Web Server
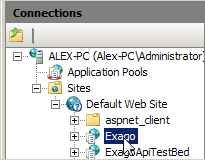
- To configure the web server to use the state service, open IIS Manager, then in the left-most Connections pane, locate and select your Exago application.

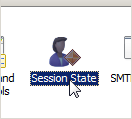
- Double-click on Session State.
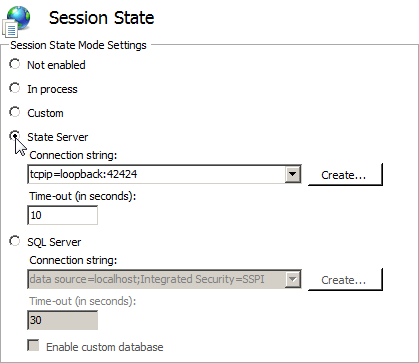
- Select the State Server setting, and input the server port and a desired timeout value.
Note
Windows’ built-in State Server runs on port 42424 by default. It is suggested that this port is used for the configuration of the State Server. However, if preferred, this may be changed.
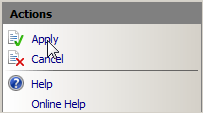
- Finally, in the right-most Actions pane, click Apply.
After applying these settings, the web server should be fully configured.
Additional Info
For more information about out-of-process session state, see the following external links:
ASP.NET State Service on Linux
Note
This section references
<WebApp>/as a placeholder for the application’s install location. The default install location is/opt/Exago/; however, this directory may be changed during installation.
A state service is installed as part of the mono runtime. Exago provides a script that can enable the state service to run headless, that can be downloaded from the Downloads page on the Support Site.
Prerequisites
Using an ASP.NET State Service on Linux requires:
- mono be installed on the state server
- the expect package be installed on the state server
- a firewall rule allowing access to port 42424 on the state server for all servers in the web farm. This port may be changed, see Choosing a Different State Service Port below for more information.
Setup
Perform these steps on the state server:
- Download the startStateServer script with the link above. This script should be saved outside of the root or bin directory of the Exago installation (e.g.
<WebApp>/StateService) in order to isolate it from the rest of the application. - Run the script as root. For example:
sudo /opt/Exago/StateService/startStateServer.sh
Perform these steps on each Exago application server in the web farm:
- Open the
<WebApp>/web.configfile for editing. - Locate the
<sessionState mode="InProc" cookieless="false" timeout="20" />line and comment it out using XML comment tags<!--and-->. - Uncomment (or add if missing) the
<sessionState mode="StateServer" cookieless="false" timeout="15" stateConnectionString="tcpip=localhost:42424" />line just below the line in step 2. - Replace localhost in the stateConnectionString attribute with the IP address of the server running the state service.When finished, the
web.configfile should look like this:<!--<sessionState mode="InProc" cookieless="false" timeout="20" /> --><sessionState mode="StateServer" cookieless="false" timeout="15" stateConnectionString="tcpip=0.0.0.0:42424" /> - Restart the web server.
Choosing a Different State Service Port
To use a port other than 42424 for the state service:
- Open the
<WebApp>/web.configfile for editing. - Modify the
<sessionState mode="StateServer" cookieless="false" timeout="15" stateConnectionString="tcpip=localhost:42424" />line with the correct port in the stateConnectionString attribute - Save and close
<WebApp>/web.config. - Restart the web server.
- Repeat steps 1–4 on each server in the web farm.
- On the state sever, open
/usr/lib/xsp/4.0/asp-state4.exe.configfor editing. - Locate the
<channel ref="tcp" port="42424" />line inside of the<channels>node. Modify the port attribute to the same port specified in step 2 above. - Save and close
/usr/lib/xsp/4.0/asp-state4.exe.config. - Restart the web server and state service.
Elasticache for Redis on AWS EC2
- Create an Elasticache for Redis instance on AWS. The Elasticache for Redis instance must be in a security group that has port number 6379 open in order to communicate with Exago. Consult with the AWS and Redis documentation on how to do this.
- On the Exago EC2 instance, install the Redis command line interface by issuing the following commands. The commands below are for Ubuntu and Debian type Linux distributions, modify them for other operating system variants.
sudo apt-get install gccwget http://download.redis.io/redis-stable.tar.gztar xvzf redis-stable.tar.gzcd redis-stablemakemake test
Note
Note that the
makeandmake teststeps will take several minutes to complete each.make testrequires that Tcl be installed on the system. If not installed already, it can be installed withsudo apt-get install tcl. - Confirm that you can connect to Redis from the Exago EC2 instance by issuing the following command:
src/redis-cli -c -h <redis-host-name> -p 6379
Substitute<redis-host-name>for the actual host name of the Elasticache for Redis instance created for step 1. The Redis CLI prompt should appear. If the session store is not correctly setup, this operation will time out instead.- Run a few test commands to insure that Redis is working. Exit the CLI with Ctrl + C on the keyboard.
- On the Exago EC2 instance, modify the Web Application’s web.config file. Locate the
sessionStatenode and modify it as follows:<sessionState mode="Custom" customProvider="MySessionStateStore"> <providers> <add name="MySessionStateStore" type="Microsoft.Web.Redis.RedisSessionStateProvider" host="{redis-host-name}:6379" accessKey="" ssl="false" /> </providers></sessionState>Substitute
<redis-host-name>for the actual host name of the Elasticache for Redis instance created for step 1. - On the Exago EC2 instance, download the NuGet Package Manager and the required packages by issuing the following commands:
Note
This article references
<WebApp>/, as a placeholder for the application’s install location. The default install location is/opt/Exago/however, this directory may have been changed during installation.cd <WebApp>/binsudo wget https://dist.nuget.org/win-x86-commandline/latest/nuget.exesudo mono nuget.exe install StackExchange.Redis.Mono.StrongNamesudo mono nuget.exe install Microsoft.Web.RedisSessionStateProvider -Version 3.0.2
- Verify that the following directories now exist in
<WebApp>/bin:Microsoft.AspNet.SessionState.SessionStateModule.1.1.0Microsoft.Web.RedisSessionStateProvider.3.0.2StackExchange.Redis.Mono.StrongName.1.2.0
- Move the libraries from their directories to
<WebApp>/binby issuing the following commands:cd <WebApp>/bin/Microsoft.Web.RedisSessionStateProvider.3.0.2/lib/net452sudo mv Microsoft.Web.RedisSessionStateProvider.dll <WebApp>/bincd <WebApp>/bin/StackExchange.Redis.Mono.StrongName.1.2.0/lib/net45sudo mv StackExchange.Redis.StrongName.dll <WebApp>/bincd <WebApp>/bin/Microsoft.AspNet.SessionState.SessionStateModule.1.1.0/lib/Net462sudo mv Microsoft.AspNet.SessionState.SessionStateModule.dll <WebApp>/bin
- Load the Admin Console to verify Exago loads without errors and to create at least one session in the cache.
- Check to make sure the cache is working by issuing the following Redis CLI command from the Exago EC2 instance.
- Re-establish a connection to the Redis CLI with the commands in step 3.1 above.
KEYS '*'
Keys for Exago should appear in the listing if the Admin Console loaded in step 8, similar to the figure below.

