Set Up Exago in a Web Farm
One method for running Exago in a distributed environment is using a Web Farm to run multiple instances of the Web Application. This may be desirable for load balancing purposes.
There are several guidelines for setup. Each will be discussed in detail in separate sections.
- Load Balancer: A load balancer server is required as the point of entry for client requests.
- State Preservation: Since Exago is a stateful application, either a State Server or sticky sessions (affinity cookie) must be enabled to prevent data loss.
- Shared Folders: Instances must have common a temp & reports folders, either on a network share or on a cloud drive. Config files must be mirrored or shared.
Note
A single Exago server with multiple worker processes could also be considered a “web farm.” In this guide we’ll consider the general term “web farm” to be synonymous with “server farm,” but refer to that specific setup as a “single-server web farm”.
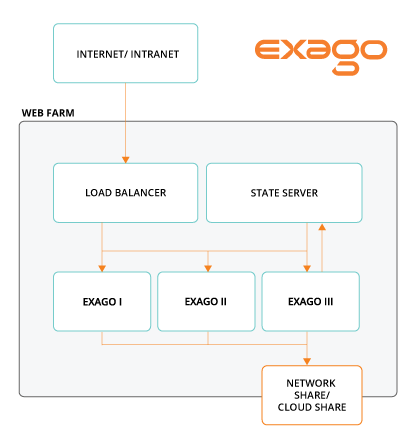
A typical setup will look like the following diagram:
Load Balancer
The load balancer server is the point of entry for most web farms. This server receives and directs client traffic to available application instances. Here, you’ll set the list of web farm servers, and set any custom options for load balancing.
Please refer to your software’s documentation for the specifics on configuration.
It is good practice to have identical Exago installations, i.e. physical path, virtual path, port number, permissions, on each web farm server.
Note
If you’re using a single-server web farm, then a load balancer is not necessary, as the server’s CPU will handle the load balancing.
State Preservation
Exago is a stateful application that preserves user information in a session, a temporary storage space for client-server communication. When a user enters the application, a session is created which persists while the application is in use. A maximum timeout length can be set in the config file to unload sessions after a period of disuse (default is 15 minutes).
In a web farm, it is important to manage sessions in order to prevent data loss. This can be done in two ways:
- Using a State Server (highly recommended)
- Sticky Sessions
State Server
A state server is a server that stores session data. This server should be highly reliable, and we recommended setting up a dedicated server for this task. However, the load balancer server can act as a state server if necessary.
Note
See the Setting up a State Server article for more information.
When a user opens a session, the load balancer routes the user to one of the web farm servers. That server then creates and stores the session data on the state server and sets a browser cookie on the user’s machine. On subsequent calls, if a user is routed to a different web farm server, that server will look for the cookie, and load the relevant session from the state server.
State server applications are typically services which listen on a port. Each web farm server needs to be configured to point to the state server address.
IIS comes with a state server called ASP.net State Service. Please refer to your software’s documentation for the specifics on configuration.
Note
If you’re using a single-server web farm, then the state service can run on the same server.
Sticky Sessions
Using sticky sessions preserves user state in a different way. When a user opens a session, the load balancer routes the user to one of the web farm servers, which creates a local session. The load balancer then sets a cookie on the user’s machine that ensures that all further calls within that session will go to the same server.
To set up sticky sessions, it’s usually as simple as enabling the option on the load balancer application settings. Please refer to your software’s documentation for the specifics. It may also be called “affinity cookie.”
We generally consider sticky sessions to be a less robust solution than using a state server. Performance can be reduced, and there is no recovery mechanism if a server goes offline.
Shared Folders
A shared location for storing Report and Temp data is required for a web farm. This can be within the network, or at an external location, such as a cloud server. In addition, it is recommended to use a shared location for the WebReports.xml configuration file. Otherwise, any changes to the config would have to be manually pushed to every single instance.
Report & Temp Folders
For each installation, either using the Admin Console or by editing the configuration file, use the following keys to set a shared storage location:
Network Share
Main Settings > Report Path: <reportpath>
Pathtoreports
Main Settings > Temp Path: <temppath>
Pathtotemp
Cloud Drive
See the Cloud Setup article for more information.
Main Settings > Report Path: <reportpath>
pathtype=azure;credentials='connection_string'
Main Settings > Temp Path: <temppath>
Localtemppath
Main Settings > Temp Cloud Service: <tempcloudservice>
type=azure;credentials='connection_string'
Config File
The hidden config setting <webfarmsupport> must be added to the general node of the config file and set to True.
The config file xml needs to be mirrored across installations, either manually by copying the file when you change it, or by setting a config cloud path.
Each installation contains a file called appSettings.config in the install directory. To set a cloud path, use the following key in the appSettings.config file for each instance:
Cloud drive
See the Cloud Setup article for more information.
<add key="ExagoConfigPath" value="pathtype=azure;credentials='connection_string';storagekey=config"/>
Additional Notes
Enabling Admin Console > Storage Management > Enable Report XML Caching and Admin Console > Storage Management > Enable Report List Caching may cause unexpected behavior as the caches in the different Exago installations will not be synchronized. This setting defaults to True when Exago is installed.
In versions of Exago pre-2020.1:
Enabling Admin Console > General > Other Settings > Enable Report XML Caching may cause unexpected behavior as the caches in the different Exago installations will not be synchronized. This setting defaults to True when Exago is installed.
Keep in mind that the information in this guide may not apply to every single configuration.
If you need more assistance, contact Exago Support.
