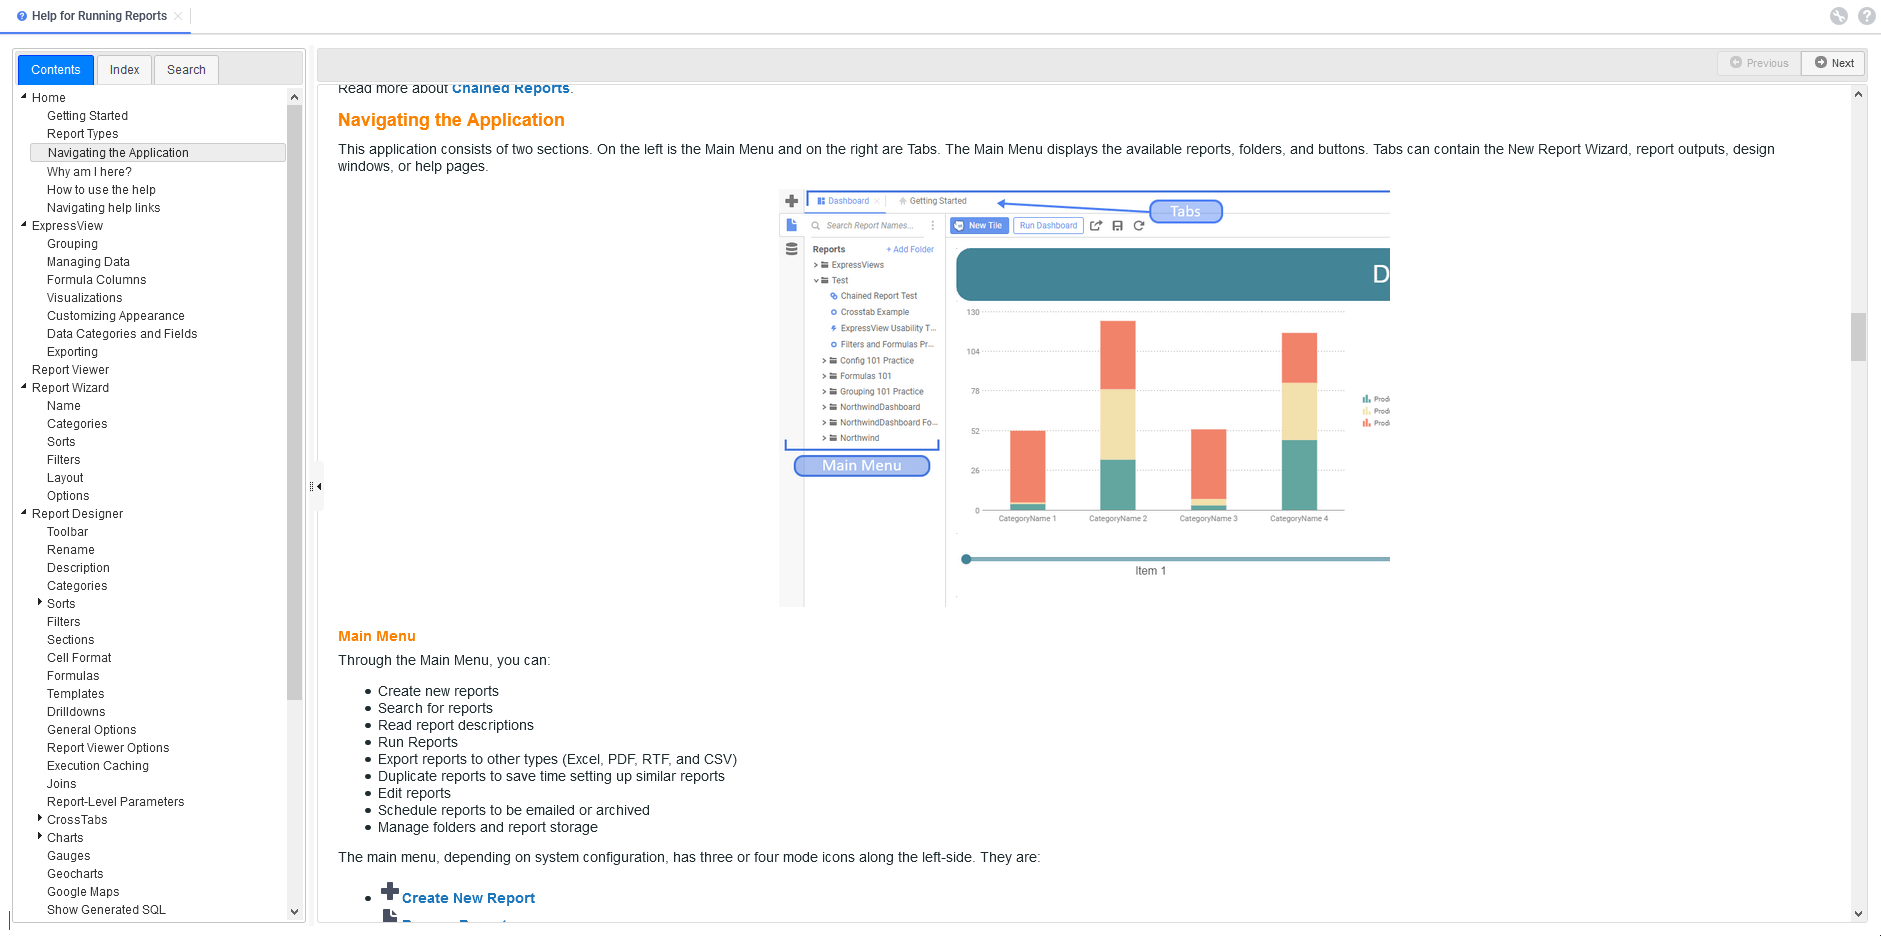
Navigating the Application
This application consists of two sections. On the left is the Main Menu and on the right are Tabs. The Main Menu displays the available reports, folders, and buttons. Tabs can contain the New Report Wizard, report outputs, design windows, or help pages.
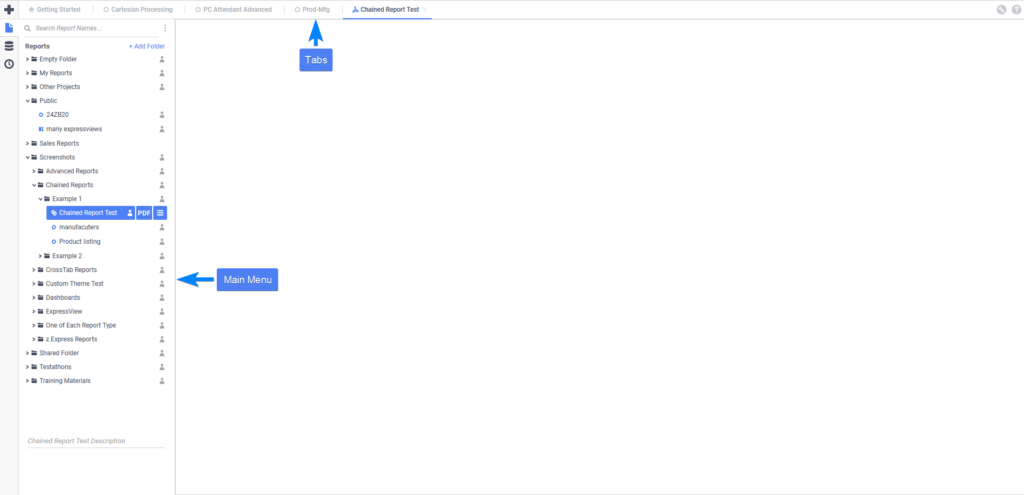
Main interface showing the main menu and tabs
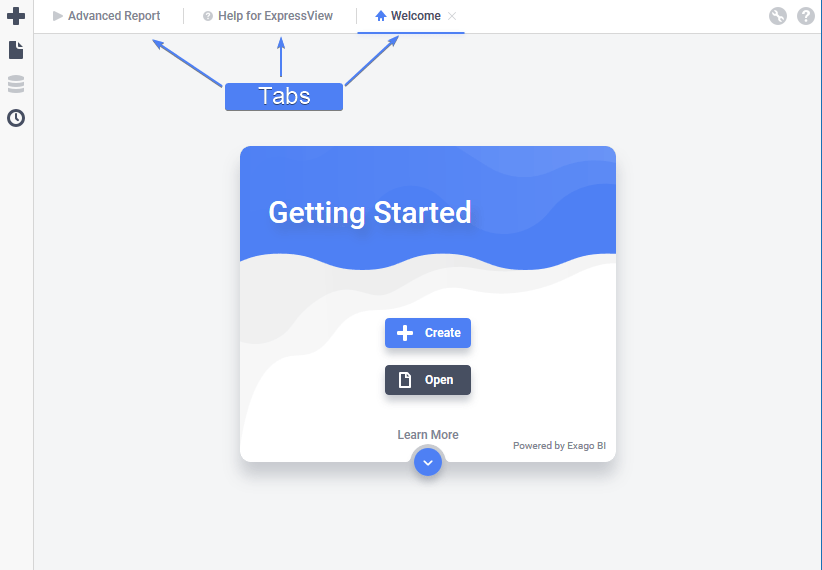
Getting Started
The Getting Started tab will be first tab displayed when entering the application in most cases. The default Getting Started page has three clickable actions:
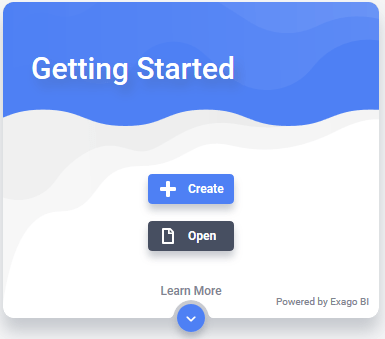
 Create — click to to open the Create New Report menu to create a new report.
- Open — click to open the Report Tree. The search field at the top of the tree will be highlighted, and the cursor will be moved there
- Learn More — click to open the Contextual Help system
 Open — click to open the
 Main Menu
Through the Main Menu, you can:
- Create new reports
- Search for reports
- Read report descriptions
- Run Reports
- Export reports to other types (Excel, PDF, RTF, and CSV)
- Duplicate reports to save time setting up similar reports
- Edit reports
- Schedule reports to be emailed or archived
- Manage folders and report storage
The main menu, depending on system configuration, has three or four mode icons on the left-side. They are:
- Create New Report
- Browse Reports
- View Data Objects
- View Schedule Manager
 Create New Report
  View Data Objects
The active mode is indicated with a blue icon, for example when the Browse Reports mode is selected, the icon looks like this:  . Click on the icons to change the Main Menu mode or click on the currently active icon to collapse the main menu and hide it. To show the main menu again, click on any of the icons.
The Main Menu can be broken down into two components: the Report Tree and the Report Descriptions Window.
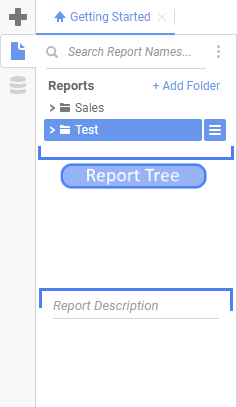
The Report Tree and Report Description
Report Tree
The Report Tree contains the individual user’s view of their applicable Folders/Sub-Folders and the Reports contained within them.
A  Search field at the top of the Report Tree allows for easily finding a report by name or description. Click the Search Options
  icon and choose to either Search by Name only or to Include Description in the search. If Include Description is checked, either press the Enter key or click the Search icon on the right to start the search.
Status icons in each content item’s row indicate its status:
- Read Only — content cannot be modified in any way (as designated by the administrator), with the Reports and Sub-Folders within inheriting the same permissions (unless otherwise specified).
- Owner — content is owned by the current user. Owners of content have full access to the item and may rename, move, and delete it for all users.
 Read Only — content cannot be modified in any way (as designated by the administrator), with the Reports and Sub-Folders within inheriting the same permissions (unless otherwise specified).
 Owner — content is owned by the current user. Owners of content have full access to the item and may rename, move, and delete it for all users.
Note
A system administrator can still restrict access to content you may own. In this case, the Read Only
A user can view a list of a folder’s contents by either:
- double-clicking the folder name
- left-clicking the Expand icon next to the folder name
 icon next to the folder name
Right-Clicking on Folders
If a user right-clicks on a folder they have access to (it is not marked read only) within the Report Tree, a menu with the following options appears. The system administrator can enable or disable certain options, so the menu in your system may appear slightly different.
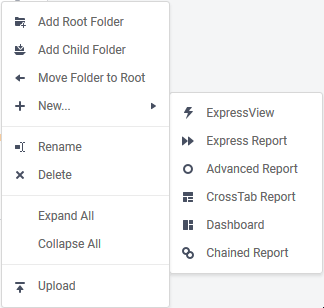
- Add Root Folder — create a new folder in the root (top) folder.
- Add Child Folder — create a new sub-folder within the existing folder.
- Move Folder To Root — moves the folder to the root of the tree.
- New… — add a new report to the folder and specify the report type.
- ExpressView
- Express Report
- Advanced Report
- CrossTab Report
- Dashboard
- Chained Report
- Rename — rename the folder.
- Delete — delete the folder. If the Owner deletes the folder, it is deleted for all users of the system. If someone other than the owner deletes the folder, it is deleted for that user only.
Note
A folder and all of its sub-folders must be empty for all users in order to delete the folder.
- Expand All — expand the contents of the relevant folder, including all of its sub-folders
- Collapse All — collapses the contents of the relevant folder, including all of its sub-folders.
- Upload — upload a local copy of a report definition file to the folder.
 Add Root Folder — create a new folder in the root (top) folder.
 Add Child Folder — create a new sub-folder within the existing folder.
 Move Folder To Root — moves the folder to the root of the tree.
 New… — add a new report to the folder and specify the report type.
 ExpressView
 Express Report
 Advanced Report
 CrossTab Report
 Dashboard
 Chained Report
 Rename — rename the folder.
 Delete — delete the folder. If the
  Upload — upload a local copy of a report definition file to the folder.
Right-Clicking on Reports
The system administrator can enable or disable certain options, so the menu in your system may appear slightly different.
- Edit — opens the Report Designer screen for the selected report.
- Run Report — executes the report and displays it in HTML format.
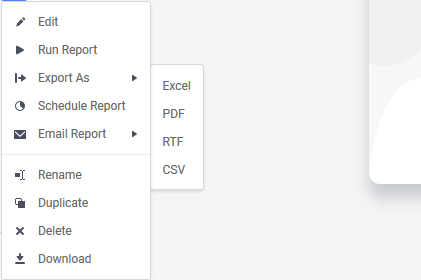
- Export As — allows the user to execute a report in any of the following formats:
- Excel — as a Microsoft Excel workbook
- PDF — as a Portable Document Format (PDF) file
- PDF (Chained Report) v2021.2+ — available only for Dashboards, each tile appears as a page in a Portable Document Format (PDF) file. See Exporting Dashboards for more information.
- PDF (Snapshot) v2021.2+ — available only for Dashboards, an image of the Dashboard as it appears on screen appears in a single page of a Portable Document Format (PDF) file. See Exporting Dashboards for more information.
- RTF — as a Rich Text Format (RTF) file
- CSV — as a plain-text Comma Separated Values (CSV) file
Note
If one of these export types is unavailable, it may have been disabled by your administrator or by the user who created the report.
- Schedule Report — Schedule a report to run immediately, at a later time, or at regular intervals. For more information on scheduling reports, review the Scheduling a Report article.
- Email Report — email a report immediately to a specified email address. Clicking an Export As… option allows the user to specify the export format type.
 Run Report — executes the report and displays it in HTML format.
 Export As — allows the user to execute a report in any of the following formats:
 Schedule Report — Schedule a report to run immediately, at a later time, or at regular intervals. For more information on scheduling reports, review the
  Email Report — email a report immediately to a specified email address. Clicking an Export As… option allows the user to specify the export format type.
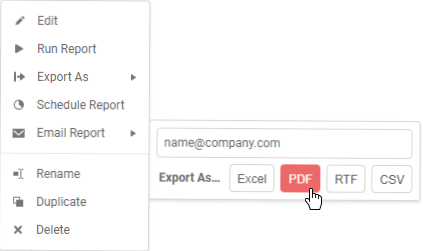
Sending a copy of the report by e-mail as a PDF attachment to [email protected]
- Rename — rename the report.
Note
In versions pre-v2020.1 if a report is renamed that is used on a composite report (i.e. a Dashboard, Chained Report or a Scheduled Report), an error message will appear when attempting to Execute or Edit it as the link will be broken.
- Duplicate — duplicate a report and place it in a specified folder
- Delete — delete the selected report. If the Owner deletes the report, it is deleted for all users of the system. If someone other than the owner deletes the report, it is deleted for that user only.
- Download — Download this report’s definition file to the local computer.
 Download — Download this report’s definition file to the local computer.
Moving Reports and Folders
If someone other than the owner of a report or folder moves it from one folder to another, the item is moved only for that user.
If the owner of the content item moves it, it is moved for all users. The owner’s permissions are “sticky” for that item. The owner will retain the same level of permission they had before the item was moved. If the owner moves a folder to one where the permissions are different than its current location, they will be prompted how to handle the permissions after the move:
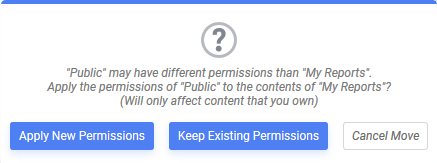
Folder Move confirmation prompt
These changes only affect content that the current user owns:
- Apply New Permissions — apply the access permissions of the destination folder to content you own.
Example: if moving My Reports to Public, any user of the system will gain access to the content in My Reports you own. The permissions don’t change for content other users own. - Keep Existing Permissions — do not apply the access permissions of the destination folder, retain the permissions the content currently has.
Example: if moving My Reports to Public, only the current user will have access to the items in My Reports. - Cancel Move — do not move the folder and leave it in its current location
Report Description Window
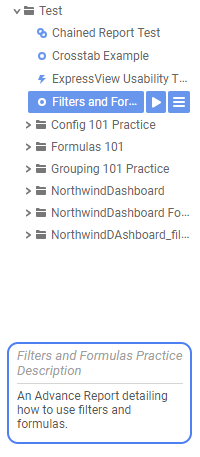
This window displays the description of the selected report. If the report was never given a description, this window remains blank when the report is selected in the Report Tree. For more info on Report Descriptions, please see Report Types.
Tabs
Tabs make up the application’s main interface. This is where users build, design, and view reports as well as access dashboards and help pages.
Getting Started tab v2020.1+

Getting Started tab pre-2020.1
Tabs can be rearranged by clicking and dragging them left or right.


A flashing tab name indicates the report has refreshed and there is new information to view
A save reminder indicator, in the form of a small circle, will appear if changes made to the report have not yet been saved (v2021.1+).
The tab on the right named Employee Information has changes waiting to be saved
Close tabs by either:
- clicking the Close Tab icon to the right of the tab name
- clicking the third mouse button (typically the scroll wheel) anywhere on the tab name
- right-clicking on a tab displays additional Tab options, such as closing the tab or closing all other tabs.

Options for closing user interface tabs
User Preferences
Clicking on the User Preferences ![]() icon in the top-right corner of the window opens the User Preferences dialog. The User Preferences dialog contains tabs: Tutorials, Startup Reports and User Reports.
icon in the top-right corner of the window opens the User Preferences dialog. The User Preferences dialog contains tabs: Tutorials, Startup Reports and User Reports.
Note
The system administrator can disable some of these preferences, so they not all be available in all environments.

User Preferences dialog
Tutorials Tab v2018.2—v2020.1
The ExpressView Designer contains a tutorial that walks first-time users through building their first one. It also has helpful hints that will pop-up throughout the building process. These features can be turned on or off from this tab.
- ExpressView Tutorial: check the checkbox to show the tutorial when launching the ExpressView Designer.
- ExpressView Hints: check the checkbox to enable the building hints. Hints can be individually hidden from the ExpressView Designer. When this checkbox is checked, only those hints that have not been individually hidden will be displayed.
- Reset All Hints: click this link to clear the hidden preferences of the individual hints. If ExpressView Hints is checked, the next time the ExpressView Designer is launched, all of the hints will be displayed.
Startup Reports Tab
A startup report is a report, Dashboard or ExpressView that runs automatically when the Web Application is launched. Instead of showing the Getting Started page, the startup reports are displayed.
To add a startup report, navigate to it in the dialog’s report tree and then either drag it to the box on the right, or click the  Add button at the bottom of the report tree. The system administrator can limit the number of startup reports each user may have.
Use the Move Row Up  and Move Row Down
  icons to change the order of the startup reports.
Use the Delete  icon to remove a startup report. This only stops the report from loading on startup, it does not remove the report from the application.
User Reports
A user report is a report that has certain customization placed on it by an individual user from within the Report Viewer. For example, a user might make certain filter value selections.
Any of your user reports will be shown in this list. User reports may be deleted by clicking on the Delete icon on the corresponding report row. User reports are added from within the Report Viewer.
Help
Clicking on the Contextual Help  icon in the top-right corner of the window walks the user through specific portions of the application. This context-sensitive help menu is indexed and completely searchable, granting the user easy access to all information.
The Context-Sensitive-Help system in the application
To learn more about getting started, continue with Report Types.
