Introduction to Action Events
 Extensions >
  Actions Events settings.
Action Events can be grouped into two general categories: Local and Global events.
- Local events have two sub-categories:
- Handlers attached to items in reports and set to fire automatically, or when the item is interacted with in the Report Viewer.
- Handlers attached to items in the Web Application User Interface and set to fire when that item is clicked.
- Global events are active throughout the application, and fire when specific events occur.
This article explains how to create Local and Global Action Events, describes the ways in which Action Events can interact with the Exago application, and lays out examples for common usage.
Create, Edit, Delete Action Events
- To add a new action event click
 Extensions > Action Events in the Main Menu and either:
- click the Add icon at the top of the main menu
- right-click and select Add from the context menu
- click the Add
- To edit an action event either:
- double click it
- select it and click the Edit icon at the top of the main menu
- right-click it and select Edit from the context menu
- To delete an action event either:
- select it and click the Delete icon at the top of the main menu
- right-click it and select Delete from the context menu
- select it and click the Delete
- To save changes and new functions click the Apply or Okay buttons
 icon at the top of the main menu
 Add from the context menu
 icon at the top of the main menu
 Edit from the context menu
 icon at the top of the main menu
 Delete from the context menu
They can also be added or modified on a per-session basis via the .NET API using the Api.SetupData.ActionEvents server call. This section details how to create Action Events through the Web Application but contains important details about programming them which will apply to the .NET API as well.
Action Event Properties
Each Action Event has the following properties:
Name
A unique identifier for each Action Event.
Function
Can either be custom code or a .NET Assembly method.
Custom Code
To save code directly in Exago, select Custom Code from the first Function dropdown. Clicking on the second dropdown opens the Custom Code dialog. See the Writing Action Events section below for information on how to access the arguments for each Event.
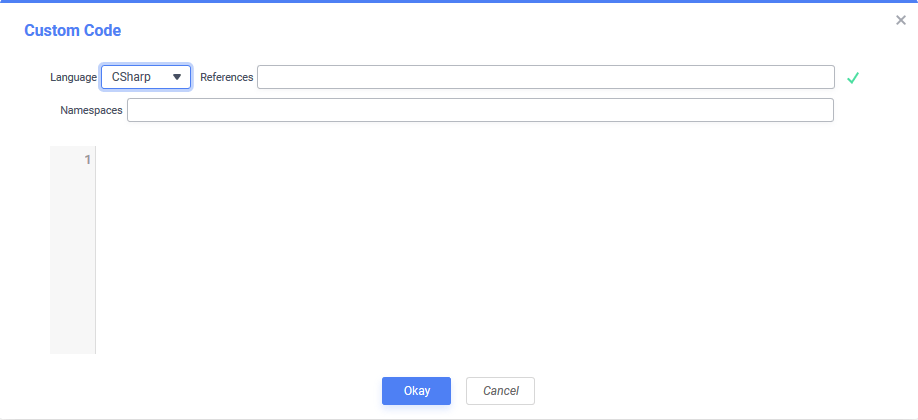
Custom Code has four additional properties:
- Language: Code can be written in C#, JavaScript (in Windows only) or VB.NET.
- References: A semicolon-separated list of any libraries that need to be referenced by the Action Event. The DLLs must be present in the
binfolder of the Exago Web Application, as well as any Schedulerbinfolders, and the Web Service API, if applicable.
Note
System.dlldoes not need to be listed as a reference as it is already available. - Namespaces: A semicolon-separated list of namespaces in the referenced DLLs or the Exago API library.
- Code: The code that will be executed.
When done writing code, click the Test Execution icon to test the code for errors.
 icon to test the code for errors.
.NET Assembly Method
There are two ways to reference a .NET Assembly method.
- Create a .NET Assembly Data Source. Select the desired assembly from the first Function dropdown. Clicking on the second dropdown will open a list of available methods.
- Add the .NET Assembly to the Bin folder (for the Web Application, Web Service API, and all Scheduler Services, if applicable). Then in the Custom Code, add the assembly as a reference, then invoke the method, e.g.
return Extensions.Events.CensorEmployeeBirthYear(sessionInfo, args);
Note
The Assembly’s DLL will be locked by Exago when it is first accessed. To replace the DLL, unlock it by restarting the IIS App pool.
Note
If you want to utilize the sessionInfo object that is passed to all Action Events the Assembly must include a reference to
WebReportsApi.dll. For more information see the article on SessionInfo.
Note
All methods used as Action Events must be static.
Event Type
Select an option in this dropdown to create an local event that will be executed when certain client-side actions are taken.
- None: This Action Event is a Global Event. A value must be set for Global Event Type.
- Load: The Action Event will execute when a report item is loaded in the Report Designer, Report Viewer, or upon Export. This type of handler is typically used to interpret and then apply alterations to report data, e.g. conditionally changing the colors on charts or maps.
- As of v2016.2.5+ Load events can affect Export formats (PDF, Excel, RTF, CSV).
- Click: The Action Event will execute when a user clicks on an item in a report or in the Exago UI. This type of handler is typically used to add additional interactive elements to reports or to the Report Designer. Click events will not function on Export formats.
For information on adding action events to specific reports, see Adding Action Events to a Report.
Global Event Type
Select an option in this dropdown to create an event that will be triggered when a condition is met in the Exago application. The Global Events article contains descriptions of all of the available event handlers.
Note
Selecting a Global Event Type will cause Exago to ignore any selected Local Event Type.
Assigned UI Item(s)
This field designates a semicolon-separated list of UI item IDs for items in the Exago interface. These elements can be intercepted and modified by entering them in this field.
Important
This selection field only applies when the Event Type is Click. This field will be ignored when any other options are selected.
Writing Action Events
When an Action Event is fired, two primary parameter objects are passed: sessionInfo and clientInfo. These are the main points of interaction with the Exago application.
- sessionInfo: Provides access to all the elements of the current Exago session. This is the server-side information. For more information see the article on sessionInfo.
Note: To access sessionInfo from a .NET Assembly, a reference toWebReportsApi.dllmust be included. - clientInfo: A JavaScript object that is accessed from within the client-side script. Provides access to any specified client-side parameters and information about the item attached to the Action Event. For a breakdown of the elements in clientInfo, see ClientInfo.
arguments array – The server-side portion of action events can also access an array of input values called args. These parameters are passed manually from client code to server code using the function clientInfo.ServerCallback(eventName, args...).
