Advanced Reports: Data Objects (v2021.1+)
A data object is a container for reportable information from a source of data. For example, a payroll report may include an Employees data object with census data such as names, addresses and hire dates as well as a Time data object with clock-in and clock-out times for each employee’s shift start and end.
When creating a new Advanced Report, data objects will be added to the report with the Add Data Objects dialog, which will appears when launched for the first time.
The Add Data Objects dialog can be recalled at any time by clicking the  Manage Data Objects button in the Data Objects Pane.
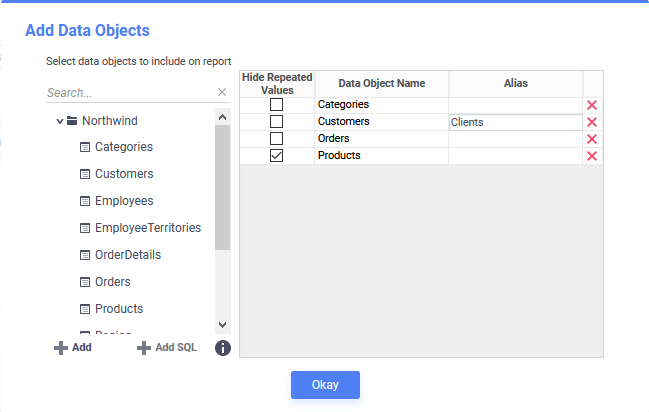
Data Objects Dialog
The Data Objects Dialog consists of two main parts:
- the available data objects tree on the left side
- the selected data objects panel on the right side
Available Data Objects Tree
The data objects tree on the left side of the dialog shows all of the available data objects that can be added to a report. A Search… field at the top of the tree allows searching for data objects by name.
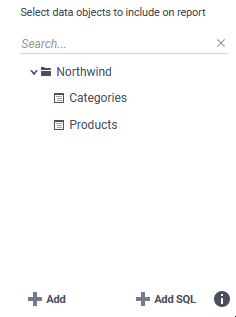
There are two data objects in the Northwind folder of this data objects tree: Categories and Products
If the system administrator has enabled it, custom SQL statements may be added as a data object in lieu of selecting one of the existing objects. For more information, refer to the Custom SQL Objects section of this article.
Selecting a Data Object from the list and clicking on the View Data Object Details  icon will display the names of the fields that are available in that object.

CompanyName, Phone and ShipperID are fields available in the Shippers data object
Selected Data Objects Panel
The selected data objects panel on the right side of the dialog is where the added data objects appear and is divided into three or four columns depending on system configuration.
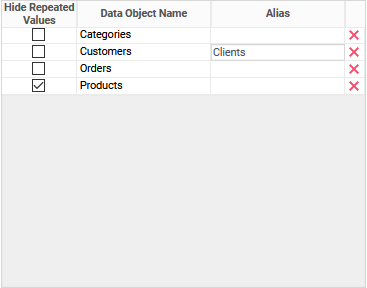
Three data objects have been added to this report: Categories, Products and Orders
- Suppress Duplicates (pre-v2021.1.1)/Hide Repeated Values (v2021.1.1+) — check this checkbox to hide repeating values on the report. For more information, review the Dealing with Duplicate Values article.
- Data Object Name — the name of the data object as it appears in the available data objects tree and the system configuration
- Alias — this column is only available if the system administrator has enabled it. When this column is present data objects can be added more than once. This allows, for example, joining the fields on the duplicate data object to other objects, or to itself in ways other than what the system administrator has defined. For more information, refer to the Advanced Reports: Joins article. Each data object must be referenced by a unique alias. The alias can also be used to provide a different name for the data object.
 icons — click the Delete icon on the corresponding row to remove the data object from the report.
 icons — click the Delete
 Add, Edit or Delete Data Objects to/from a Report
The instructions below assume that the Add Data Objects dialog is already open on screen.
- To add a data object to a report, first choose the data object from the available data objects tree and then either:
- click the arrow icon to the right of the object’s name
- click the Add button at the bottom of the tree
- double-click on the data object’s name
- drag-and-drop the data object from the tree to the selected data objects panel
- click the Add SQL button to add a custom SQL object to the report. There may not be any other data objects in the selected data objects panel for this button to have an effect. For more information, refer to the Custom SQL Objects section of this article.
- Click the Custom SQL Object icon in the Data Object Name column to edit it. Only Custom SQL Objects can be edited from the Add Data Objects dialog.
- Click the Delete icon on the corresponding row to delete a data object,. This removes the data object from the report, but not from the system configuration.
 Add button at the bottom of the tree
 icon in the Data Object Name column to edit it. Only Custom SQL Objects can be edited from the Add Data Objects dialog.
Custom SQL Objects
This is an advanced feature, and the system administrator must enable it for it to be available.
Caution
If a Custom SQL Object is added as a data object to a report, it may be the only data object on that report.
Custom SQL Objects may only be added to new report, not an existing report.
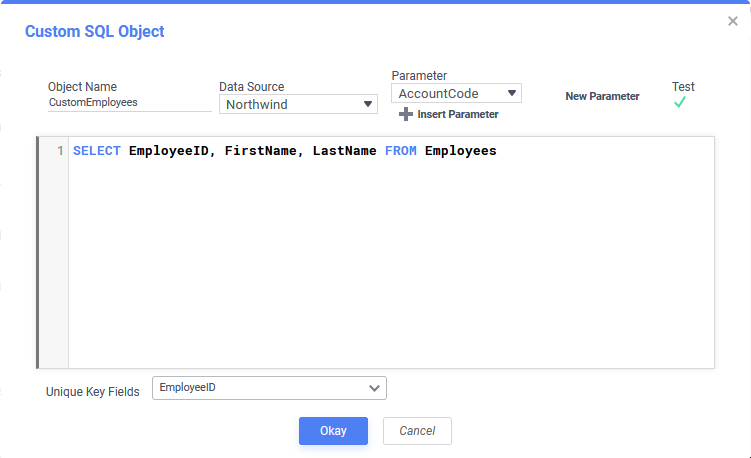
Custom SQL Object dialog in v2021.1.15+
Writing Custom SQL Objects requires underlying knowledge of the data source architecture and its relevant SQL language.
To add a Custom SQL Object to a report:
- Click the Add SQL button in the Add Data Objects dialog to open the Custom SQL Object dialog.
- Provide a unique Object Name for the new data object. It cannot match any existing data object in the system configuration nor contain any of the following characters, including spaces:
[ ] { } . , @ - Choose the Data Source that this Custom SQL Object will retrieve data from. Not all data sources in the system may support Custom SQL objects.
- In the large code window (shown with a line number 1 in the figure above), enter the full SQL statement. This statement will be inserted as a subquery when it is sent to the data source for processing.
Caution
ORDER BYclauses and Common Table Expressions are not supported in subqueries. To sort a report with a Custom SQL Data Object, use the Sorts dialog in the Report Designer. - System variables called parameters, that change based on certain environmental situations (e.g. who is running the report) may optionally be added to the SQL statement by selecting the name from the dropdown and clicking the Insert Parameter button.To add a new report-level parameter to the report, and the system administrator has enabled it, first click the New Parameter button to open the Report Parameters dialog (v2021.1.15+)
- Click the Test icon to check the SQL statement for validity.
- Click the Unique Key Fields list to select unique keys for the custom SQL object. Select the columns that uniquely identity a record in this object.
- Click the Add button to add a unique key field to the list.
- Select the name of the field from the dropdown, or click the Delete icon to remove it.
- Once all unique key fields are defined, click Okay.
- Click the
- Click Okay to close the Custom SQL Object dialog and save the object to the Add Data Objects dialog.
 icon to check the SQL statement for validity.
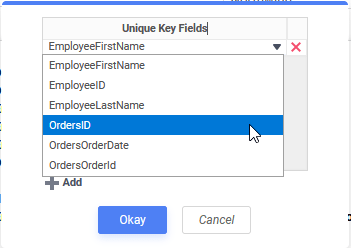
To edit a Custom SQL Object:
- Click the Manage Data Objects button in the Data Objects Pane to open the Add Data Object dialog.
- Click the Custom SQL Object icon in the Data Object Name column to open the Custom SQL Object dialog.
- Follow the instructions in the add a Custom SQL Object section above to edit the object.
Example
The following Custom SQL Object could be used to generate the basic report shown below with order IDs and dates of each order placed by each salesperson in the company in a certain month.
SELECTdbo.[Orders].[OrderID] AS c0,dbo.[Orders].[OrderDate] AS c1,dbo.[Employees].[FirstName] AS c2,dbo.[Employees].[LastName] AS c3,dbo.[Employees].[EmployeeID] AS c4,dbo.[Orders].[EmployeeID] AS c5FROM dbo.[Employees]INNER JOIN dbo.[Orders] ON (dbo.[Employees].[EmployeeID] = dbo.[Orders].[EmployeeID])WHEREMonth(dbo.[Orders].[OrderDate]) = 7
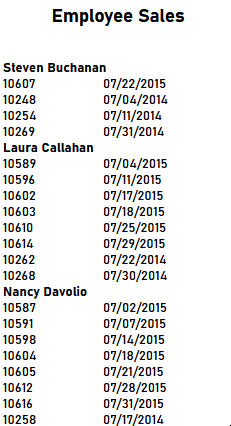
Output of the report
